> ## Documentation Index
> Fetch the complete documentation index at: https://craft-support.mintlify.site/llms.txt
> Use this file to discover all available pages before exploring further.
# Domains
> Set up your craft.me link or connect your own custom domain to published Craft documents for professional branding and memorable URLs.
Transform your published Craft URLs from generic links into professional, branded web addresses. Customize your craft.me link for free, or connect your own domain for complete brand control.
Custom domains are available on **Plus or higher** subscription plans.
## craft.me Link vs. Custom Domains
Craft offers two types of domain customization:
### craft.me Link (Free)
Every Craft user gets a personalized craft.me link available on all plans including Starter.
**Default format** - `brave-lion-456.craft.me` (randomly generated)
**Customized format** - `yourname.craft.me` (personalize for free)
To customize your craft.me link:
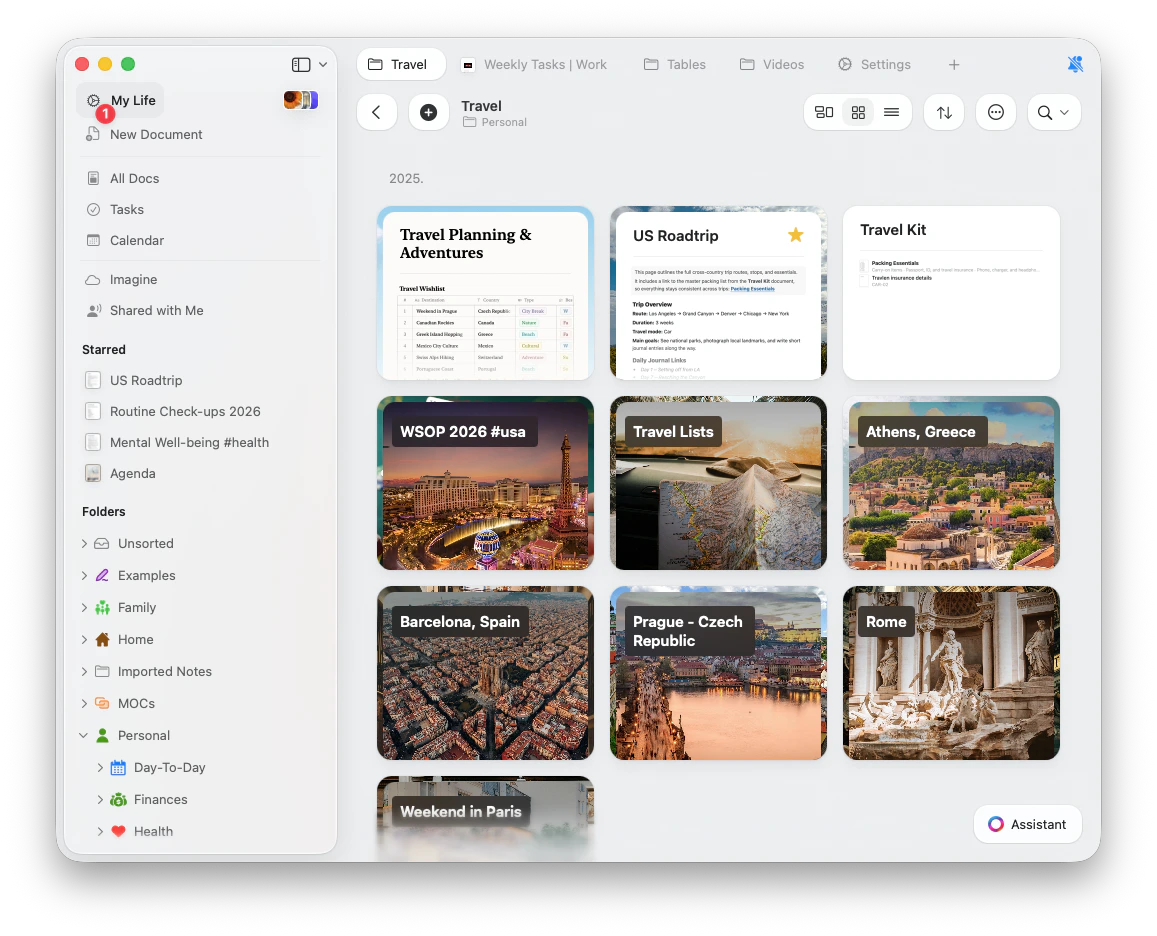
Go to **Settings**
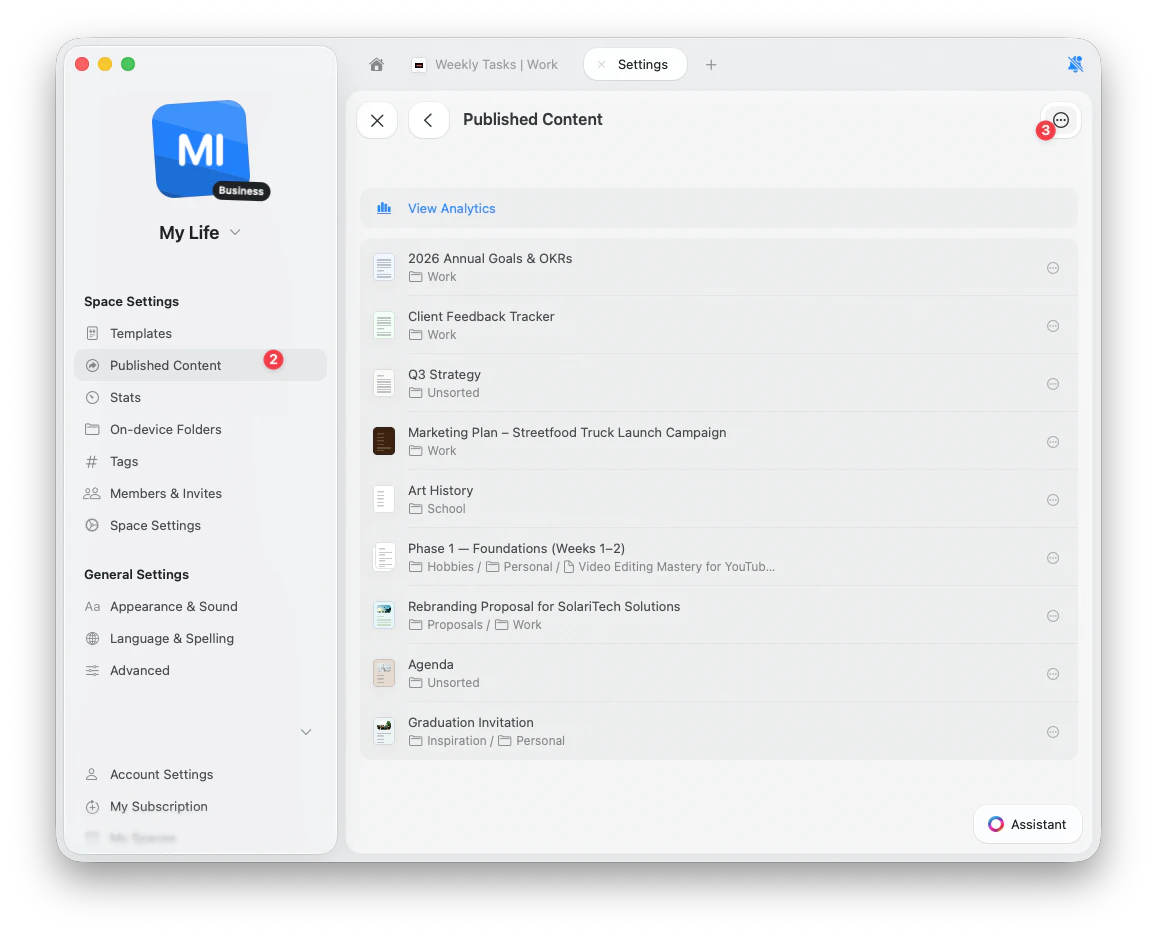
Navigate to **Published Content**
Click the **...** (three dots) button, then select **Settings**
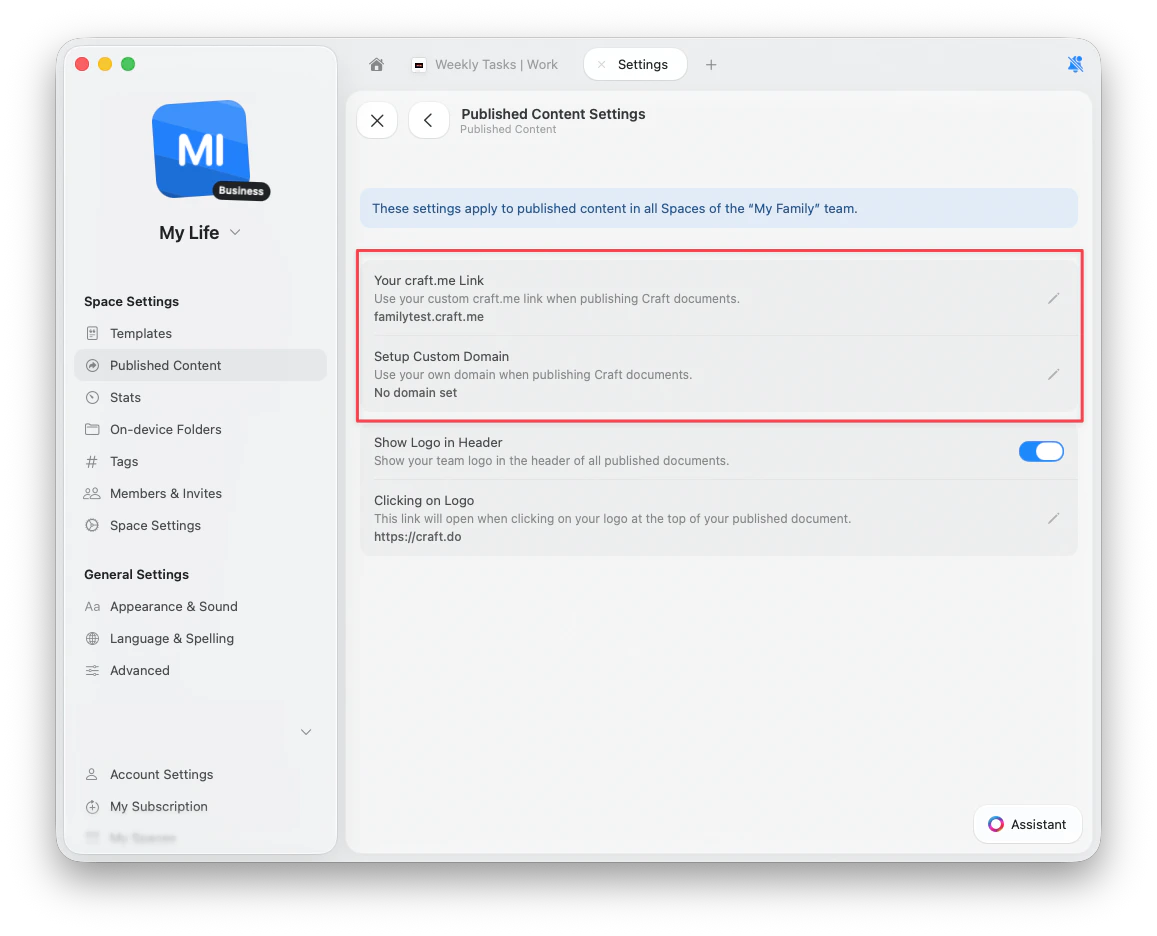
Click **Your craft.me Link**
Enter your desired subdomain (e.g., `yourname` for `yourname.craft.me`)
 ### Custom Domains (Plus+)
Connect your own domain for complete brand control.
**Example** - `blog.yourcompany.com` or `docs.yourcompany.com`
This allows published documents to appear as part of your primary website, creating a seamless experience for readers.
Craft currently supports **subdomains only**, not root domains. For example, `blog.company.com` is supported, but `company.com` is not.
## Setting Up Custom Domains
To use your own custom domain, you'll need to modify DNS records through your domain provider.
### Step 1: Access Domain Settings
Go to **Settings**
Navigate to **Published Content**
Click the **...** (three dots) button, then select **Settings**
Click **Setup Custom Domain**
Enter your subdomain (e.g., `blog.yourcompany.com`)
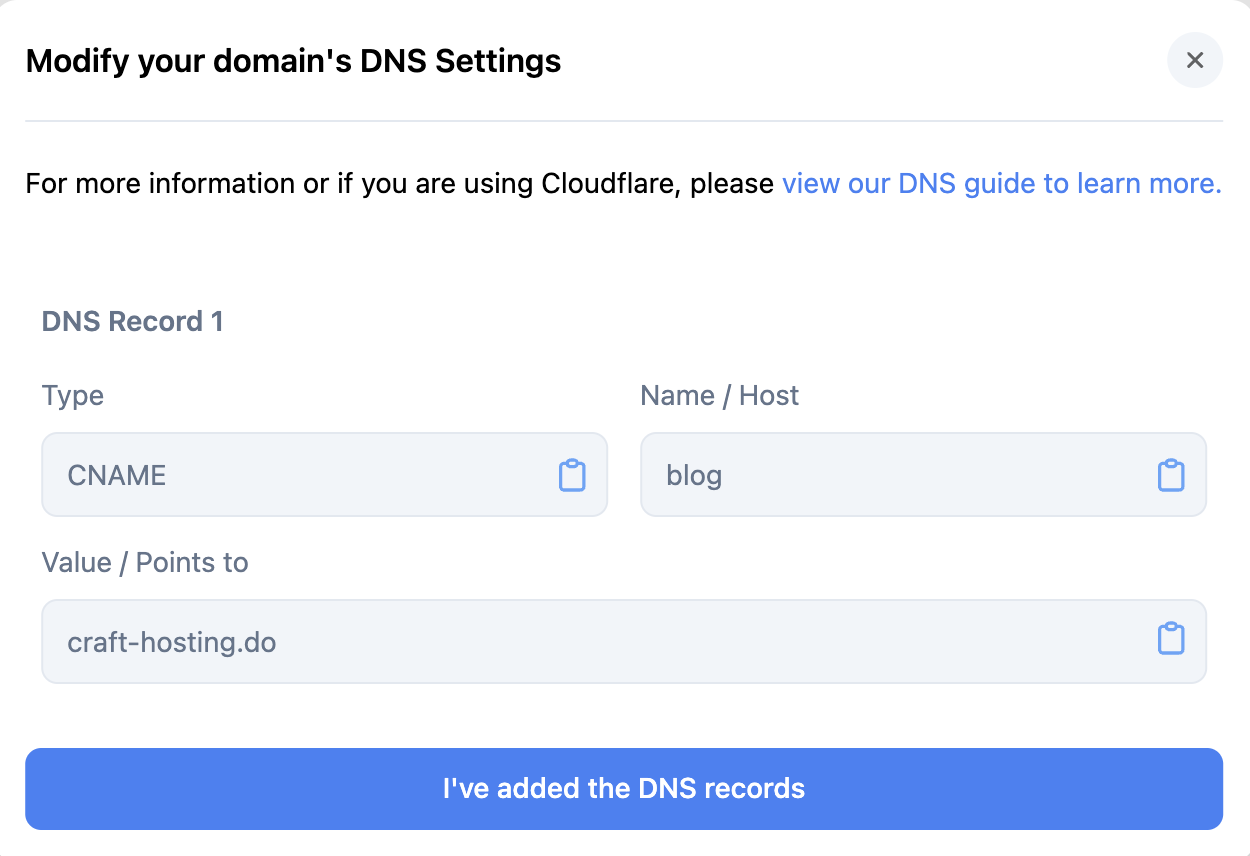
Craft will provide you with CNAME records to add to your DNS provider.
### Step 2: Configure DNS Records
Add the CNAME records provided by Craft to your domain's DNS settings. Instructions vary by provider:
1. **Set CNAME Record**
To connect a subdomain (e.g., `blog.yourcompany.com`):
| Type | Name | Content |
| ----- | ---- | ---------------- |
| CNAME | blog | craft-hosting.do |
### Custom Domains (Plus+)
Connect your own domain for complete brand control.
**Example** - `blog.yourcompany.com` or `docs.yourcompany.com`
This allows published documents to appear as part of your primary website, creating a seamless experience for readers.
Craft currently supports **subdomains only**, not root domains. For example, `blog.company.com` is supported, but `company.com` is not.
## Setting Up Custom Domains
To use your own custom domain, you'll need to modify DNS records through your domain provider.
### Step 1: Access Domain Settings
Go to **Settings**
Navigate to **Published Content**
Click the **...** (three dots) button, then select **Settings**
Click **Setup Custom Domain**
Enter your subdomain (e.g., `blog.yourcompany.com`)
Craft will provide you with CNAME records to add to your DNS provider.
### Step 2: Configure DNS Records
Add the CNAME records provided by Craft to your domain's DNS settings. Instructions vary by provider:
1. **Set CNAME Record**
To connect a subdomain (e.g., `blog.yourcompany.com`):
| Type | Name | Content |
| ----- | ---- | ---------------- |
| CNAME | blog | craft-hosting.do |
 2. **Configure SSL/TLS**
Set encryption mode to **Full** or **Full (strict)** to prevent redirect errors:
2. **Configure SSL/TLS**
Set encryption mode to **Full** or **Full (strict)** to prevent redirect errors:
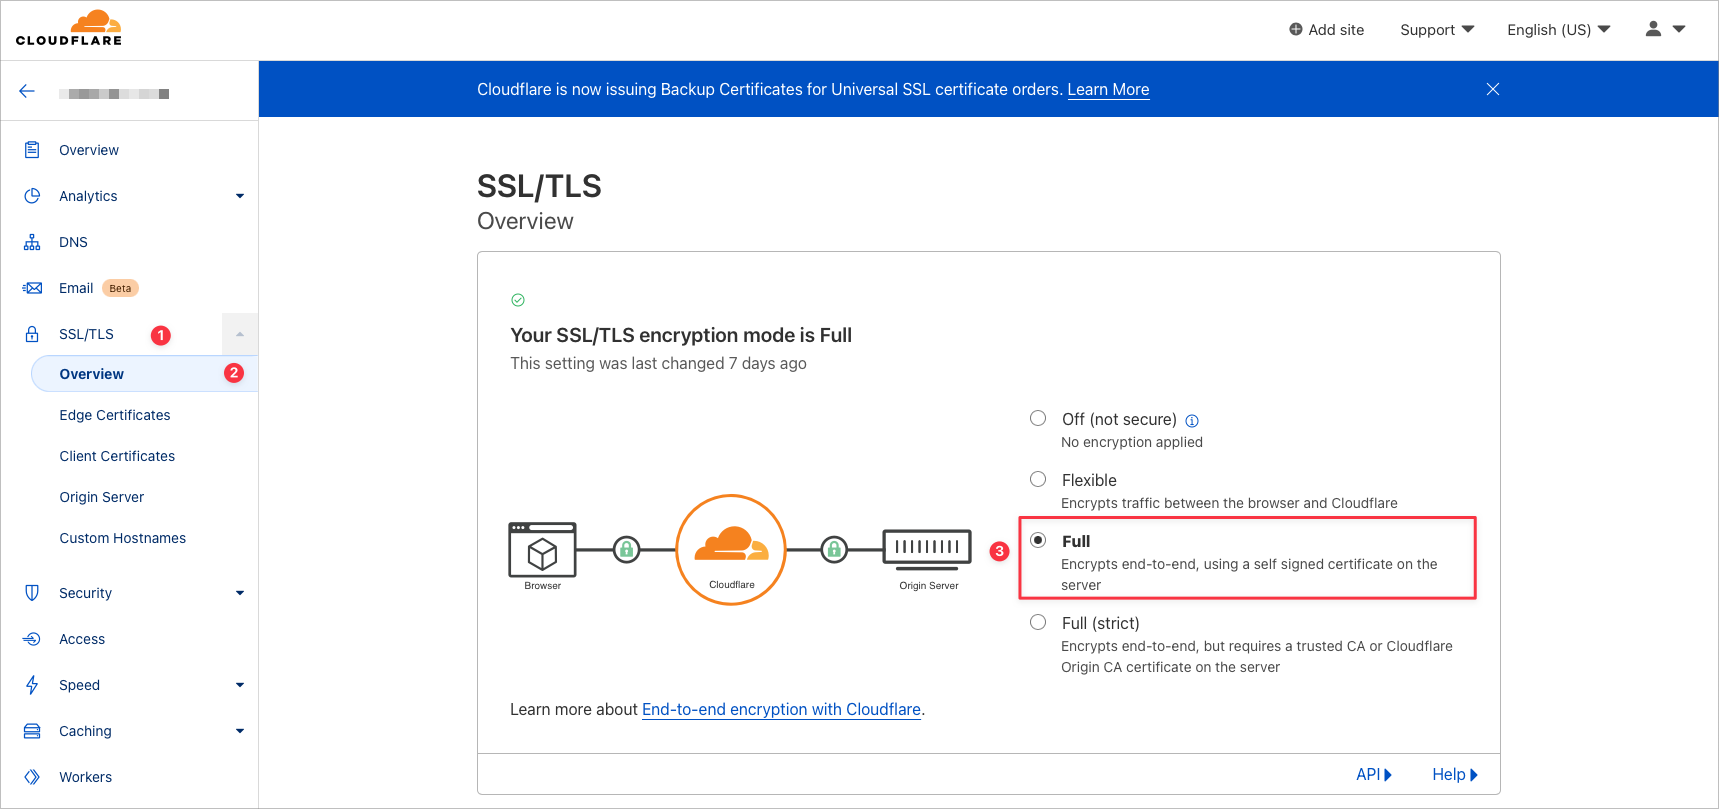 If you see `err_too_many_redirects`, your SSL/TLS setting is likely on "Flexible". Change it to "Full" or "Full (strict)" to fix this.
Log in to GoDaddy and navigate to **Domain Management**
Under **My Products**, click **Manage DNS** next to Domains
Select the domain you want to manage
Click **Add** to create a new record
Paste in the CNAME records provided by Craft
Save your records
Return to Craft and click **I've added my DNS record**
DNS propagation usually takes a few minutes but can take up to 24 hours.
Select **Domain List** from the left sidebar
Click **Manage** next to your domain
Click **Advanced DNS**
Click **Add New Record**
Paste in the CNAME records from Craft
Save your records
Return to Craft and click **I've added my DNS record**
Click the **Domains** tab from the side navigation
Click the dropdown next to **Manage**, then choose **DNS**
Scroll down and click **Add Record** under the CNAME section
Paste in the CNAME records from Craft
Save your records
Return to Craft and click **I've added my DNS record**
### Step 3: Verify Connection
After adding DNS records:
1. Click **I've added my DNS record** in Craft
2. DNS propagation begins (usually a few minutes, up to 24 hours)
3. The status indicator changes from amber to green when verified
4. Your custom domain is ready to use
You can verify DNS propagation using [whatsmydns.net](https://www.whatsmydns.net/).
## Managing Custom Domains
### Disconnecting a Domain
If you need to change or remove your custom domain:
Go to your **Team Settings**
Scroll to the **Danger Zone** section
Select **Disconnect Custom Domain**
When you disconnect a custom domain, all published links (past and present) revert to their original `craft.me/s/path` format. Any links shared with your custom domain will stop working.
### Using URL Paths
Craft supports customizing both the domain and the URL path:
**Full URL structure** - `subdomain.domain.com/custom-path`
For example: `blog.company.com/product-launch`
Where:
* `blog` = subdomain
* `company.com` = main domain
* `product-launch` = custom path
Single-character path segments are not supported (e.g., `blog.company.com/b/post` won't work).
## Frequently Asked Questions
### Can I use a root domain?
Currently, Craft only supports **subdomains**, not root domains.
**Supported** - `blog.company.com/post`
**Not supported** - `company.com/post`
Some users work around this by using `www` as the subdomain with `/` as the path, but this is provider-specific and not officially supported.
### How many domains can I add?
Craft currently supports **one custom domain per team**. You can change your domain as often as needed, but only one domain can be active at a time across all documents and spaces.
### Do I need to purchase a domain through Craft?
No, Craft doesn't sell domains. You must already own a domain through a registrar like GoDaddy, Namecheap, Google Domains, or others.
### What happens to old links after changing domains?
If you disconnect or change your custom domain:
* All published links revert to `craft.me/s/path` format
* Old links with your previous custom domain will stop working
* The original Craft links continue to work
* You should update any shared links to reflect the change
### What if I cancel my Plus subscription?
If you downgrade to Starter:
* You cannot add new custom domains
* Existing custom domain links continue to work
* You cannot modify or update the custom domain configuration
* All Starter plan limitations apply
### Can I revert to Craft links for one document?
No, custom domains apply to your entire team and cannot be removed for individual documents. To use `craft.me` links again, you must disconnect the custom domain entirely (affecting all published content).
## Troubleshooting
If your custom domain isn't working after 24 hours:
* Verify DNS records are correctly added
* Ensure old DNS records are removed
* Check SSL/TLS settings (should be "Full" or "Full (strict)" for Cloudflare)
* Use [whatsmydns.net](https://www.whatsmydns.net/) to verify DNS propagation
* Contact support at [feedback@craft.do](mailto:feedback@craft.do) if issues persist
Once your custom domain is successfully verified and activated, you may see a message when opening the page indicating no document is found.
**Solution** - You need to assign a "Home Page" for your custom domain.
Share any document in your Space that you want to be the home page
In the sharing settings, remove the URL path completely
Click **Save**
This sets the document as the root page of your custom domain. For example, if your domain is `blog.company.com`, removing the path makes the document accessible at `blog.company.com` instead of `blog.company.com/some-path`.
For general troubleshooting, sync, or platform-specific issues, see the [Troubleshooting Guide](/en/introduction/troubleshooting).
***
Learn how to publish documents to the web
Add custom logos to published pages
Track engagement on published content
If you see `err_too_many_redirects`, your SSL/TLS setting is likely on "Flexible". Change it to "Full" or "Full (strict)" to fix this.
Log in to GoDaddy and navigate to **Domain Management**
Under **My Products**, click **Manage DNS** next to Domains
Select the domain you want to manage
Click **Add** to create a new record
Paste in the CNAME records provided by Craft
Save your records
Return to Craft and click **I've added my DNS record**
DNS propagation usually takes a few minutes but can take up to 24 hours.
Select **Domain List** from the left sidebar
Click **Manage** next to your domain
Click **Advanced DNS**
Click **Add New Record**
Paste in the CNAME records from Craft
Save your records
Return to Craft and click **I've added my DNS record**
Click the **Domains** tab from the side navigation
Click the dropdown next to **Manage**, then choose **DNS**
Scroll down and click **Add Record** under the CNAME section
Paste in the CNAME records from Craft
Save your records
Return to Craft and click **I've added my DNS record**
### Step 3: Verify Connection
After adding DNS records:
1. Click **I've added my DNS record** in Craft
2. DNS propagation begins (usually a few minutes, up to 24 hours)
3. The status indicator changes from amber to green when verified
4. Your custom domain is ready to use
You can verify DNS propagation using [whatsmydns.net](https://www.whatsmydns.net/).
## Managing Custom Domains
### Disconnecting a Domain
If you need to change or remove your custom domain:
Go to your **Team Settings**
Scroll to the **Danger Zone** section
Select **Disconnect Custom Domain**
When you disconnect a custom domain, all published links (past and present) revert to their original `craft.me/s/path` format. Any links shared with your custom domain will stop working.
### Using URL Paths
Craft supports customizing both the domain and the URL path:
**Full URL structure** - `subdomain.domain.com/custom-path`
For example: `blog.company.com/product-launch`
Where:
* `blog` = subdomain
* `company.com` = main domain
* `product-launch` = custom path
Single-character path segments are not supported (e.g., `blog.company.com/b/post` won't work).
## Frequently Asked Questions
### Can I use a root domain?
Currently, Craft only supports **subdomains**, not root domains.
**Supported** - `blog.company.com/post`
**Not supported** - `company.com/post`
Some users work around this by using `www` as the subdomain with `/` as the path, but this is provider-specific and not officially supported.
### How many domains can I add?
Craft currently supports **one custom domain per team**. You can change your domain as often as needed, but only one domain can be active at a time across all documents and spaces.
### Do I need to purchase a domain through Craft?
No, Craft doesn't sell domains. You must already own a domain through a registrar like GoDaddy, Namecheap, Google Domains, or others.
### What happens to old links after changing domains?
If you disconnect or change your custom domain:
* All published links revert to `craft.me/s/path` format
* Old links with your previous custom domain will stop working
* The original Craft links continue to work
* You should update any shared links to reflect the change
### What if I cancel my Plus subscription?
If you downgrade to Starter:
* You cannot add new custom domains
* Existing custom domain links continue to work
* You cannot modify or update the custom domain configuration
* All Starter plan limitations apply
### Can I revert to Craft links for one document?
No, custom domains apply to your entire team and cannot be removed for individual documents. To use `craft.me` links again, you must disconnect the custom domain entirely (affecting all published content).
## Troubleshooting
If your custom domain isn't working after 24 hours:
* Verify DNS records are correctly added
* Ensure old DNS records are removed
* Check SSL/TLS settings (should be "Full" or "Full (strict)" for Cloudflare)
* Use [whatsmydns.net](https://www.whatsmydns.net/) to verify DNS propagation
* Contact support at [feedback@craft.do](mailto:feedback@craft.do) if issues persist
Once your custom domain is successfully verified and activated, you may see a message when opening the page indicating no document is found.
**Solution** - You need to assign a "Home Page" for your custom domain.
Share any document in your Space that you want to be the home page
In the sharing settings, remove the URL path completely
Click **Save**
This sets the document as the root page of your custom domain. For example, if your domain is `blog.company.com`, removing the path makes the document accessible at `blog.company.com` instead of `blog.company.com/some-path`.
For general troubleshooting, sync, or platform-specific issues, see the [Troubleshooting Guide](/en/introduction/troubleshooting).
***
Learn how to publish documents to the web
Add custom logos to published pages
Track engagement on published content