> ## Documentation Index
> Fetch the complete documentation index at: https://craft-support.mintlify.site/llms.txt
> Use this file to discover all available pages before exploring further.
# Blocks and Pages
> Learn how Craft's block-based structure lets you build documents that grow with your ideas.
Craft uses a unique block-based structure that makes organizing your work intuitive and flexible. Understanding how blocks, pages, and documents work together is fundamental to getting the most out of Craft.
## What is a Block?
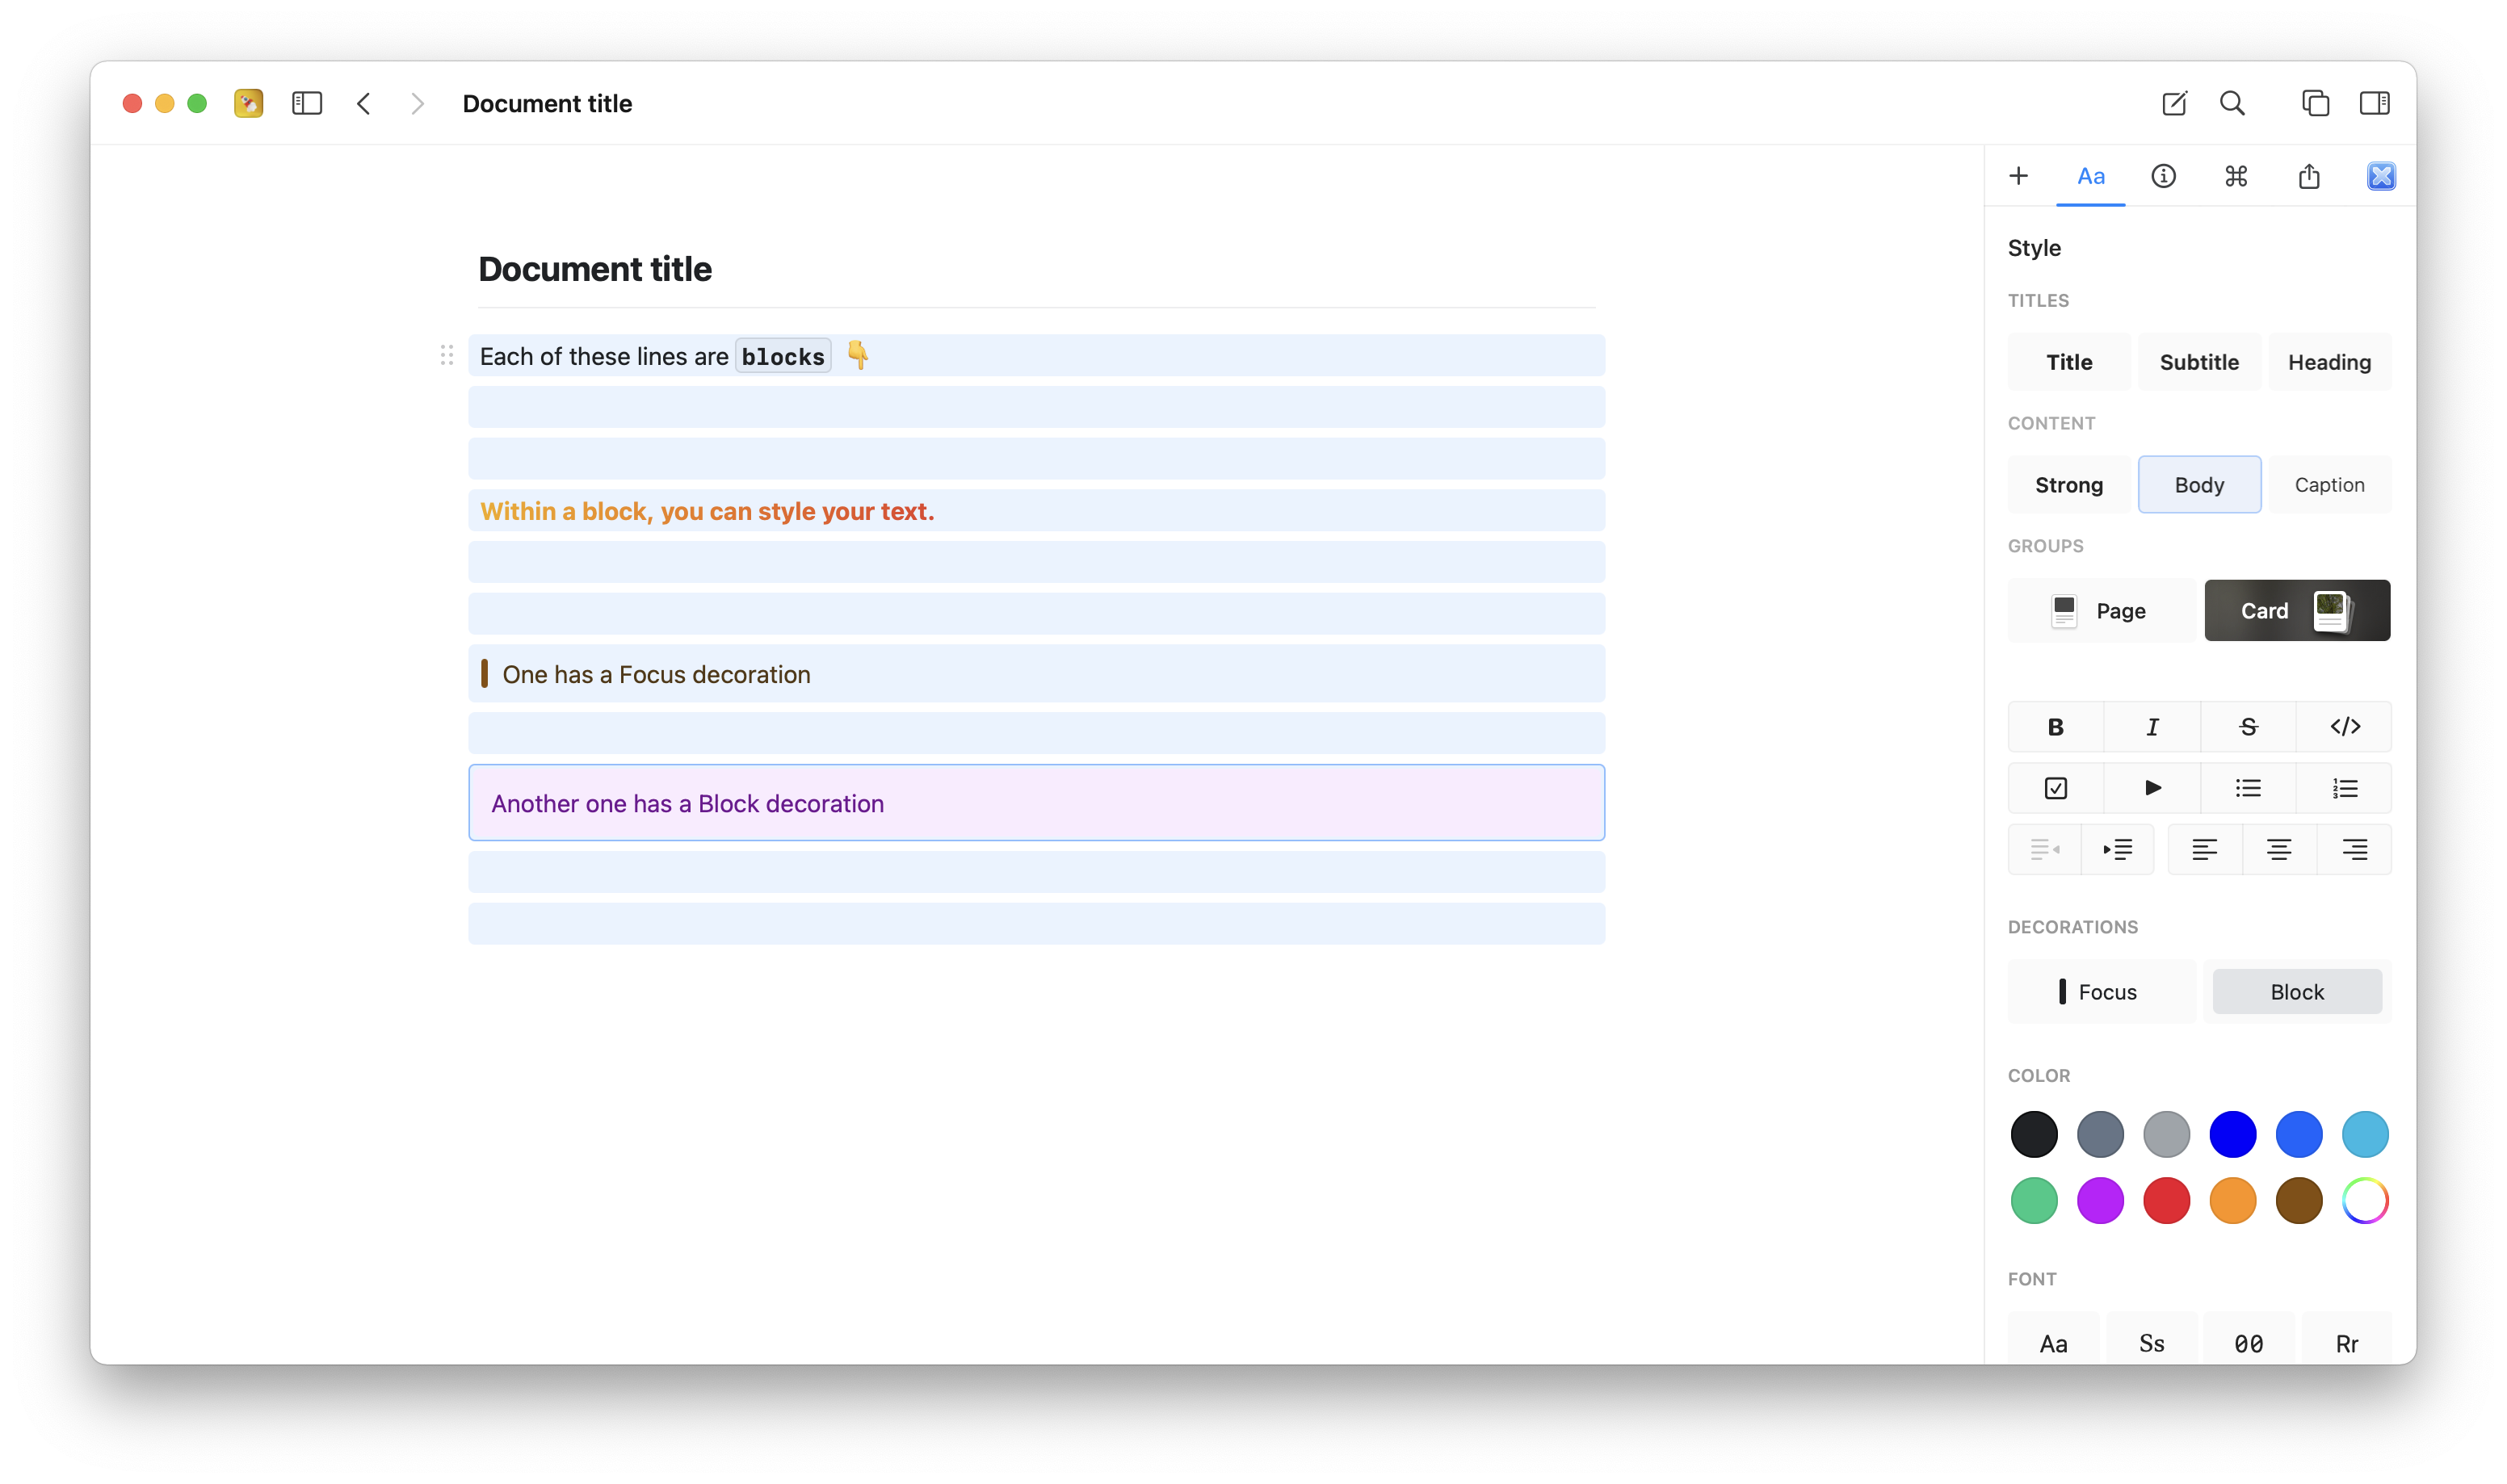
In Craft, everything you create is a block. Every paragraph, image, table, or heading is its own independent unit. This might seem simple, but it's incredibly powerful.
Each block can:
* Contain its own content (text, media, tables, etc.)
* Be styled independently
* Be moved, copied, or deleted on its own
* Transform into a page with deeper content
Think of blocks as LEGO pieces. You can arrange them however you want, and each one can serve multiple purposes.
 ## From Blocks to Pages
Here's where Craft gets interesting: any block can become a page. When a block contains nested content beneath it, it's called a page. You can click on a page block to navigate inside it and see all its nested content.
This creates a natural hierarchy:
* A **block** is a single unit of content
* A **page** is a block that contains other blocks inside it
* A **document** is the top-level container you see in your sidebar
You don't need to plan your structure upfront. Start writing, and when a section gets long or needs more detail, turn it into a page. Craft adapts to your thinking process.
## Creating Structure with Page Styles
While any block with nested content is technically a page, Craft offers special visual styles to make pages stand out:
**Page Style**: This text style is designed specifically for page blocks. It gives the block a distinct appearance that signals "there's more inside."
**Card Style**: Cards provide an even more visual way to represent pages. They can include:
* Cover images
* Custom colors
* Rich previews
Both styles make it easy to scan your document and understand its structure at a glance.
## Grouping Blocks into Pages
When you have several related blocks, you can group them into a page. This is perfect for organizing your thoughts as you write.
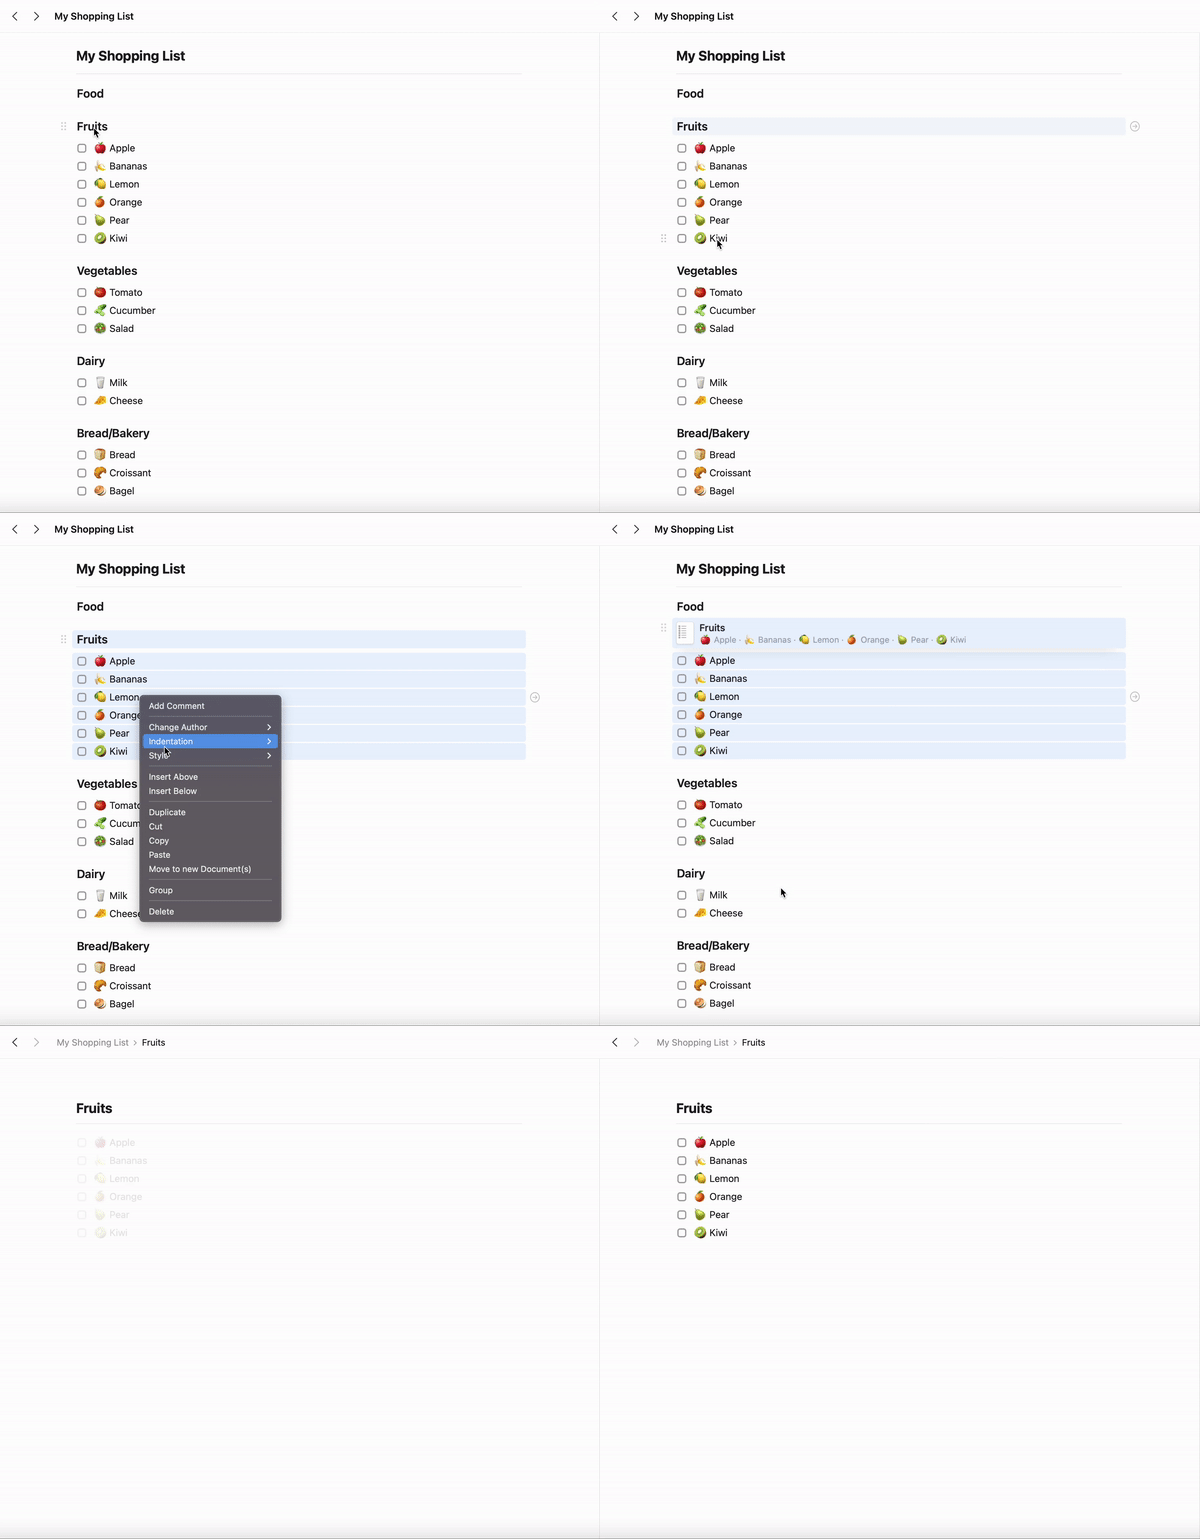
**To group blocks on Mac:**
Select the blocks you want to group (click and drag, or Cmd+click multiple blocks)
Right-click on the selection
Choose "Group" from the menu, or press `Cmd+G`
The first block in your selection becomes the page title, and all other blocks move inside it.
## From Blocks to Pages
Here's where Craft gets interesting: any block can become a page. When a block contains nested content beneath it, it's called a page. You can click on a page block to navigate inside it and see all its nested content.
This creates a natural hierarchy:
* A **block** is a single unit of content
* A **page** is a block that contains other blocks inside it
* A **document** is the top-level container you see in your sidebar
You don't need to plan your structure upfront. Start writing, and when a section gets long or needs more detail, turn it into a page. Craft adapts to your thinking process.
## Creating Structure with Page Styles
While any block with nested content is technically a page, Craft offers special visual styles to make pages stand out:
**Page Style**: This text style is designed specifically for page blocks. It gives the block a distinct appearance that signals "there's more inside."
**Card Style**: Cards provide an even more visual way to represent pages. They can include:
* Cover images
* Custom colors
* Rich previews
Both styles make it easy to scan your document and understand its structure at a glance.
## Grouping Blocks into Pages
When you have several related blocks, you can group them into a page. This is perfect for organizing your thoughts as you write.
**To group blocks on Mac:**
Select the blocks you want to group (click and drag, or Cmd+click multiple blocks)
Right-click on the selection
Choose "Group" from the menu, or press `Cmd+G`
The first block in your selection becomes the page title, and all other blocks move inside it.
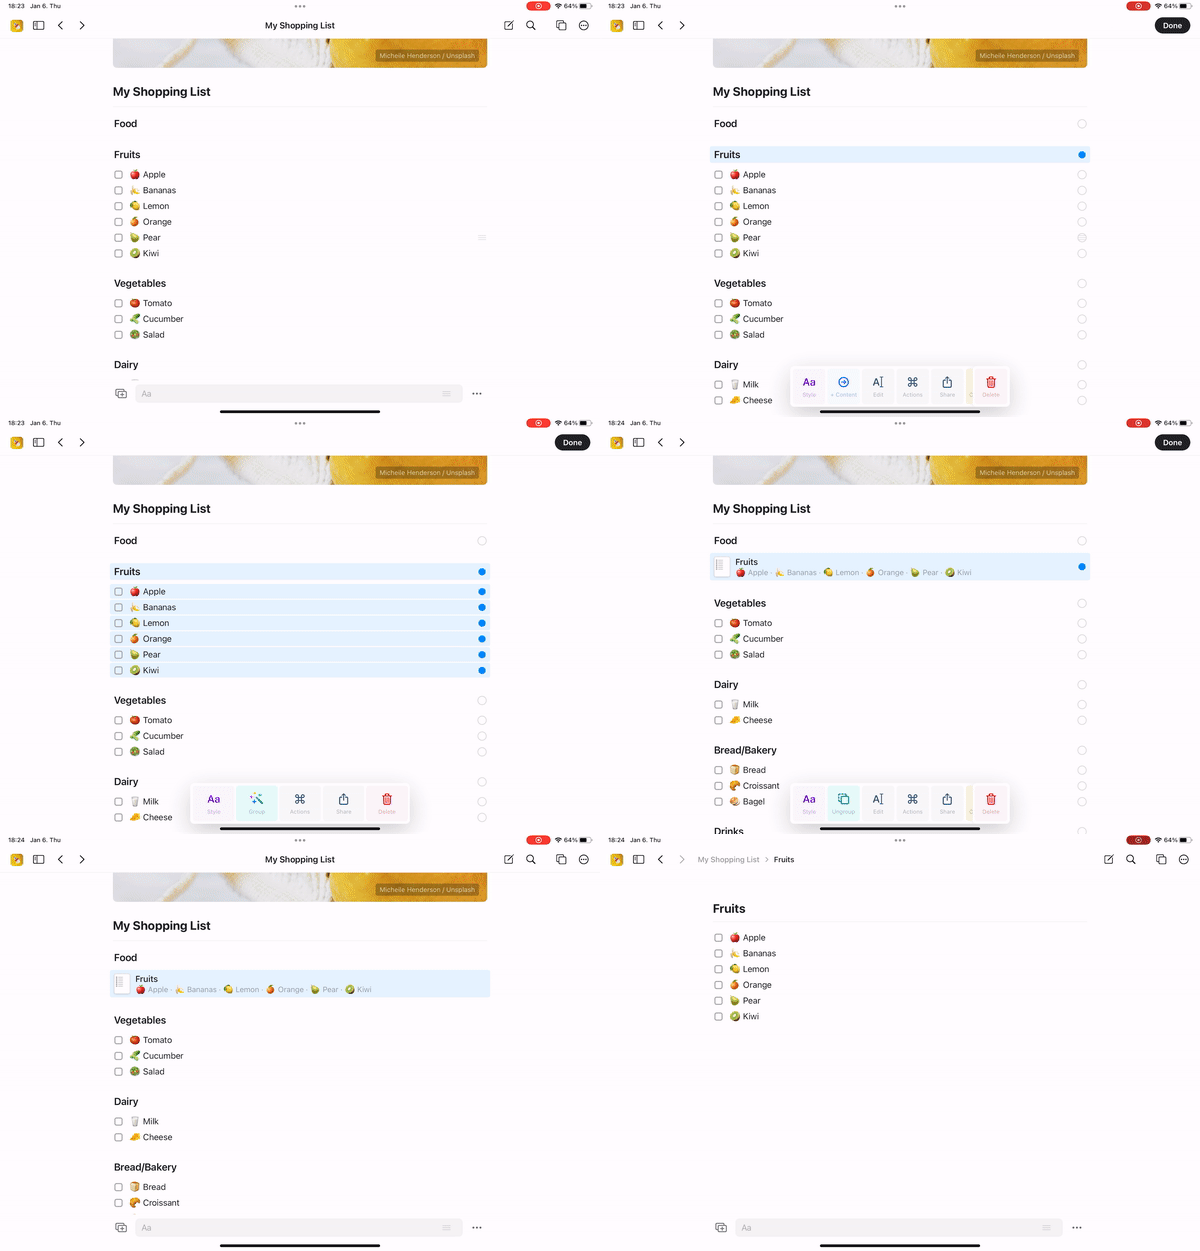
 **To group blocks on iOS:**
Swipe right on blocks to select them (or use long-press for multi-select)
Tap the action menu
Choose "Group"
**To group blocks on iOS:**
Swipe right on blocks to select them (or use long-press for multi-select)
Tap the action menu
Choose "Group"
 **Ungrouping**: To reverse the process, select a page block and press `Cmd+Shift+G` (Mac) or use the "Ungroup" action. All nested blocks move back to the same level as the page.
## Moving Blocks Between Documents
Because blocks are independent units, you can easily move them around – even between different documents.
**Method 1: Cut and Paste**
1. Select the blocks you want to move
2. Press `Cmd+X` to cut
3. Navigate to the destination document
4. Press `Cmd+V` to paste
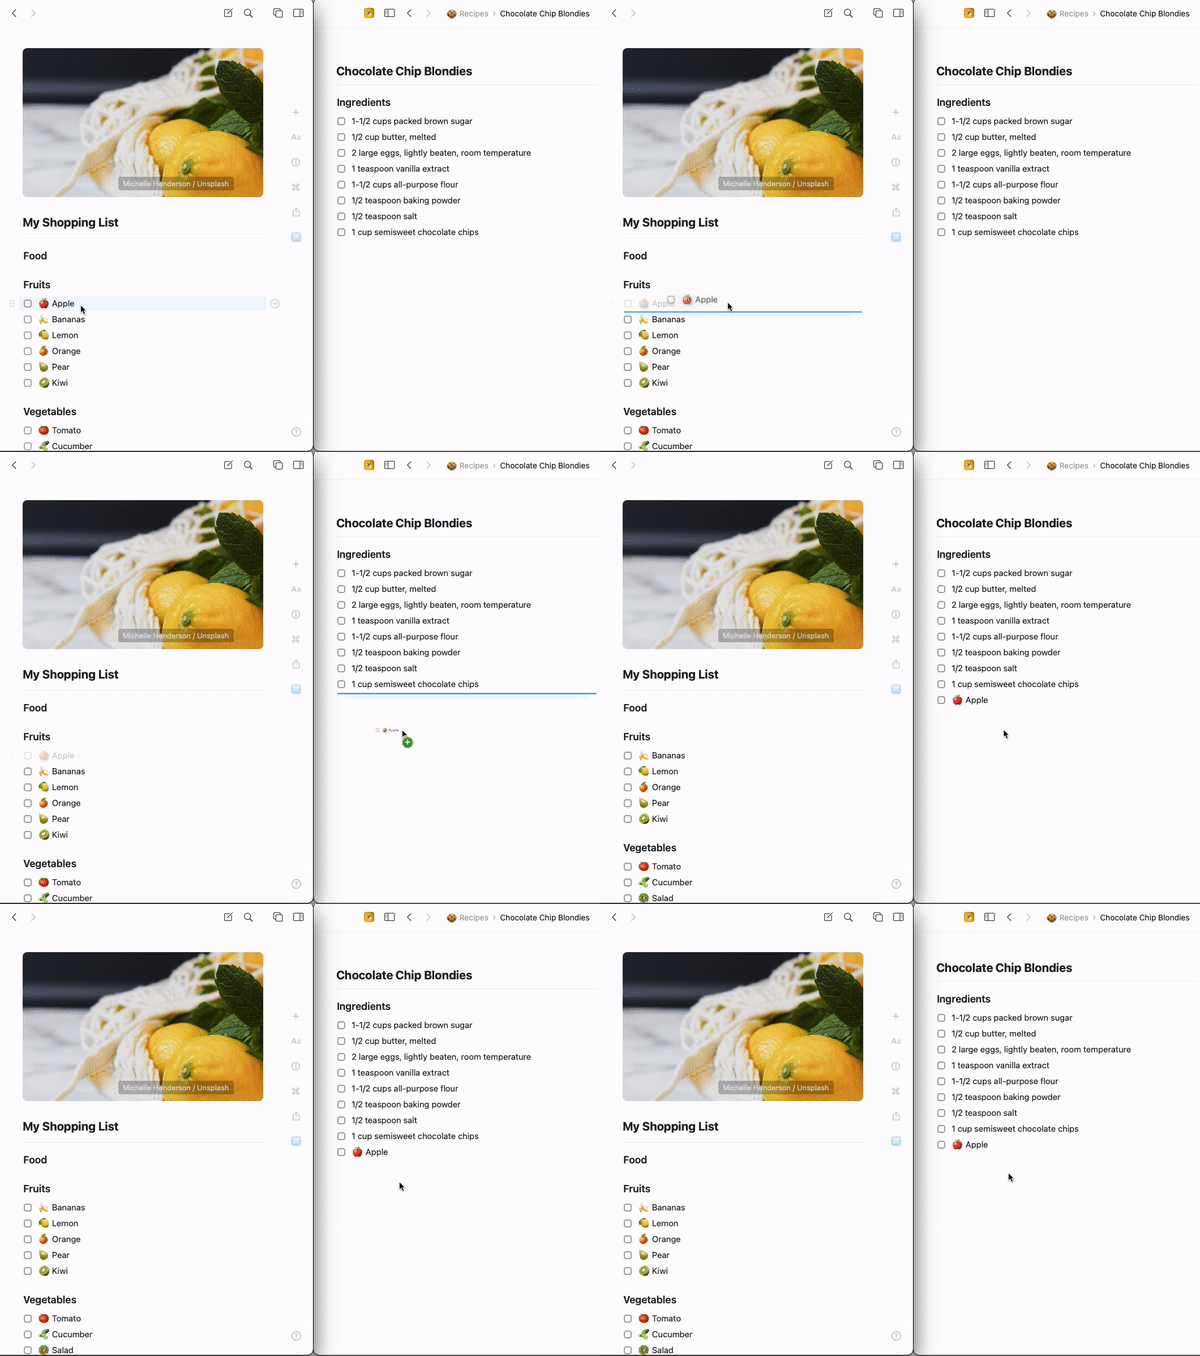
**Method 2: Drag and Drop**
1. Open two Craft windows side by side (`Cmd+Shift+N` for a new window)
2. Click and drag blocks from one window to the other
3. Release to drop them in the new location
**Ungrouping**: To reverse the process, select a page block and press `Cmd+Shift+G` (Mac) or use the "Ungroup" action. All nested blocks move back to the same level as the page.
## Moving Blocks Between Documents
Because blocks are independent units, you can easily move them around – even between different documents.
**Method 1: Cut and Paste**
1. Select the blocks you want to move
2. Press `Cmd+X` to cut
3. Navigate to the destination document
4. Press `Cmd+V` to paste
**Method 2: Drag and Drop**
1. Open two Craft windows side by side (`Cmd+Shift+N` for a new window)
2. Click and drag blocks from one window to the other
3. Release to drop them in the new location
 You can also drag blocks directly onto document names in the sidebar to move them quickly.
**Method 1: Cut and Paste**
1. Swipe to select blocks
2. Tap "Cut" in the action menu
3. Navigate to the destination document
4. Tap where you want to paste and choose "Paste"
**Method 2: Move to Document**
1. Select the blocks
2. Tap the three-dot menu
3. Choose "Move to Document"
4. Select the destination
**Cut and Paste Method**
1. Select blocks (click and drag, or Ctrl+click on Windows)
2. Press `Ctrl+X` (Windows) or `Cmd+X` (Mac) to cut
3. Navigate to destination
4. Press `Ctrl+V` or `Cmd+V` to paste
## Important Note About Pages vs Documents
Understanding the difference between pages and documents is crucial for organizing your work:
**Documents** are top-level items that appear in your sidebar. They can be:
* Starred for quick access
* Organized into folders
* Moved to trash and recovered
* Shared or published independently
**Pages** are blocks within documents. They:
* Only exist inside a parent document
* Don't appear separately in your sidebar
* Are treated as content within the document
* Can't be starred or organized independently
When you delete a page (a block with nested content), it doesn't go to the Recently Deleted folder like documents do. To recover a deleted page, you need to:
* Use `Cmd+Z` (undo) immediately after deletion, or
* Restore an earlier version of the document using version history
Learn more about [version history](/en/write-and-edit/version-history) and [data recovery](/en/account-and-subscription/storage-and-recovery).
## Building Your Knowledge, One Block at a Time
The beauty of Craft's block system is that it matches how you think. You don't need to decide upfront whether something should be a separate document or a page within a document.
Start writing. If a section needs more detail, turn it into a page. If a page grows too complex, you can always move those blocks into a new document.
This flexibility means your structure can evolve naturally as your ideas develop. Just focus on capturing your thoughts – Craft makes it easy to organize them later.
## Common Workflows
**Building a Project Plan**
1. Create a document called "Q1 Projects"
2. Write each project name as a block
3. Click into each project block to add details inside
4. Add tasks, notes, and files within each project page
**Taking Meeting Notes**
1. Start with agenda items as regular blocks
2. As discussion happens, add details beneath each item
3. The agenda items automatically become pages
4. Navigate in and out to see overview or details
**Creating a Knowledge Base**
1. Start with broad topics as blocks
2. Click into each topic to add subtopics
3. Each subtopic can become its own page
4. Build a hierarchy as deep as you need
Collapse and expand content sections
Learn how to format and style blocks
When you need database-like features
Folders, tags, and spaces
Create connections between blocks and pages
Use AI to understand and work with your content structure
You can also drag blocks directly onto document names in the sidebar to move them quickly.
**Method 1: Cut and Paste**
1. Swipe to select blocks
2. Tap "Cut" in the action menu
3. Navigate to the destination document
4. Tap where you want to paste and choose "Paste"
**Method 2: Move to Document**
1. Select the blocks
2. Tap the three-dot menu
3. Choose "Move to Document"
4. Select the destination
**Cut and Paste Method**
1. Select blocks (click and drag, or Ctrl+click on Windows)
2. Press `Ctrl+X` (Windows) or `Cmd+X` (Mac) to cut
3. Navigate to destination
4. Press `Ctrl+V` or `Cmd+V` to paste
## Important Note About Pages vs Documents
Understanding the difference between pages and documents is crucial for organizing your work:
**Documents** are top-level items that appear in your sidebar. They can be:
* Starred for quick access
* Organized into folders
* Moved to trash and recovered
* Shared or published independently
**Pages** are blocks within documents. They:
* Only exist inside a parent document
* Don't appear separately in your sidebar
* Are treated as content within the document
* Can't be starred or organized independently
When you delete a page (a block with nested content), it doesn't go to the Recently Deleted folder like documents do. To recover a deleted page, you need to:
* Use `Cmd+Z` (undo) immediately after deletion, or
* Restore an earlier version of the document using version history
Learn more about [version history](/en/write-and-edit/version-history) and [data recovery](/en/account-and-subscription/storage-and-recovery).
## Building Your Knowledge, One Block at a Time
The beauty of Craft's block system is that it matches how you think. You don't need to decide upfront whether something should be a separate document or a page within a document.
Start writing. If a section needs more detail, turn it into a page. If a page grows too complex, you can always move those blocks into a new document.
This flexibility means your structure can evolve naturally as your ideas develop. Just focus on capturing your thoughts – Craft makes it easy to organize them later.
## Common Workflows
**Building a Project Plan**
1. Create a document called "Q1 Projects"
2. Write each project name as a block
3. Click into each project block to add details inside
4. Add tasks, notes, and files within each project page
**Taking Meeting Notes**
1. Start with agenda items as regular blocks
2. As discussion happens, add details beneath each item
3. The agenda items automatically become pages
4. Navigate in and out to see overview or details
**Creating a Knowledge Base**
1. Start with broad topics as blocks
2. Click into each topic to add subtopics
3. Each subtopic can become its own page
4. Build a hierarchy as deep as you need
Collapse and expand content sections
Learn how to format and style blocks
When you need database-like features
Folders, tags, and spaces
Create connections between blocks and pages
Use AI to understand and work with your content structure