> ## Documentation Index
> Fetch the complete documentation index at: https://craft-support.mintlify.site/llms.txt
> Use this file to discover all available pages before exploring further.
# Craft Assistant 사용하기
> 대화를 시작하고 Assistant와 함께 콘텐츠를 이해하고 변환하는 방법을 알아보세요.
Craft Assistant는 자연어로 콘텐츠를 이해하고 작업할 수 있도록 도와줍니다. 질문하고, 문서를 요약하고, 스페이스 전체에서 정보를 탐색하고, 지원되는 플랫폼에서는 문서를 직접 편집할 수 있습니다.
## Craft Assistant 사용 가능 위치
Craft Assistant는 모든 주요 플랫폼에서 작동합니다.
**스페이스 수준 및 문서 수준**에서 사용 가능합니다. 문서, 작업, 캘린더, 컬렉션, 코드 편집기, 브라우즈 뷰에서 작동합니다.
iPad 및 iPhone의 **스페이스 수준 및 문서 수준**에서 사용 가능합니다. 문서, 작업, 캘린더, 컬렉션, 코드 편집기, 브라우즈 뷰에서 작동합니다.
**스페이스 수준 및 문서 수준**에서 사용 가능합니다. 문서, 작업, 캘린더, 컬렉션, 코드 편집기, 브라우즈 뷰에서 작동합니다.
**스페이스 수준 및 문서 수준**에서 사용 가능합니다. 문서, 작업, 캘린더, 컬렉션, 코드 편집기, 브라우즈 뷰에서 작동합니다.
## 대화 시작하기
문서를 열거나 스페이스 뷰에 있으세요.
Assistant 패널을 여세요.
모델과 모드를 선택하고 프롬프트를 입력하세요.
응답 또는 적용된 변경 사항을 확인하세요.
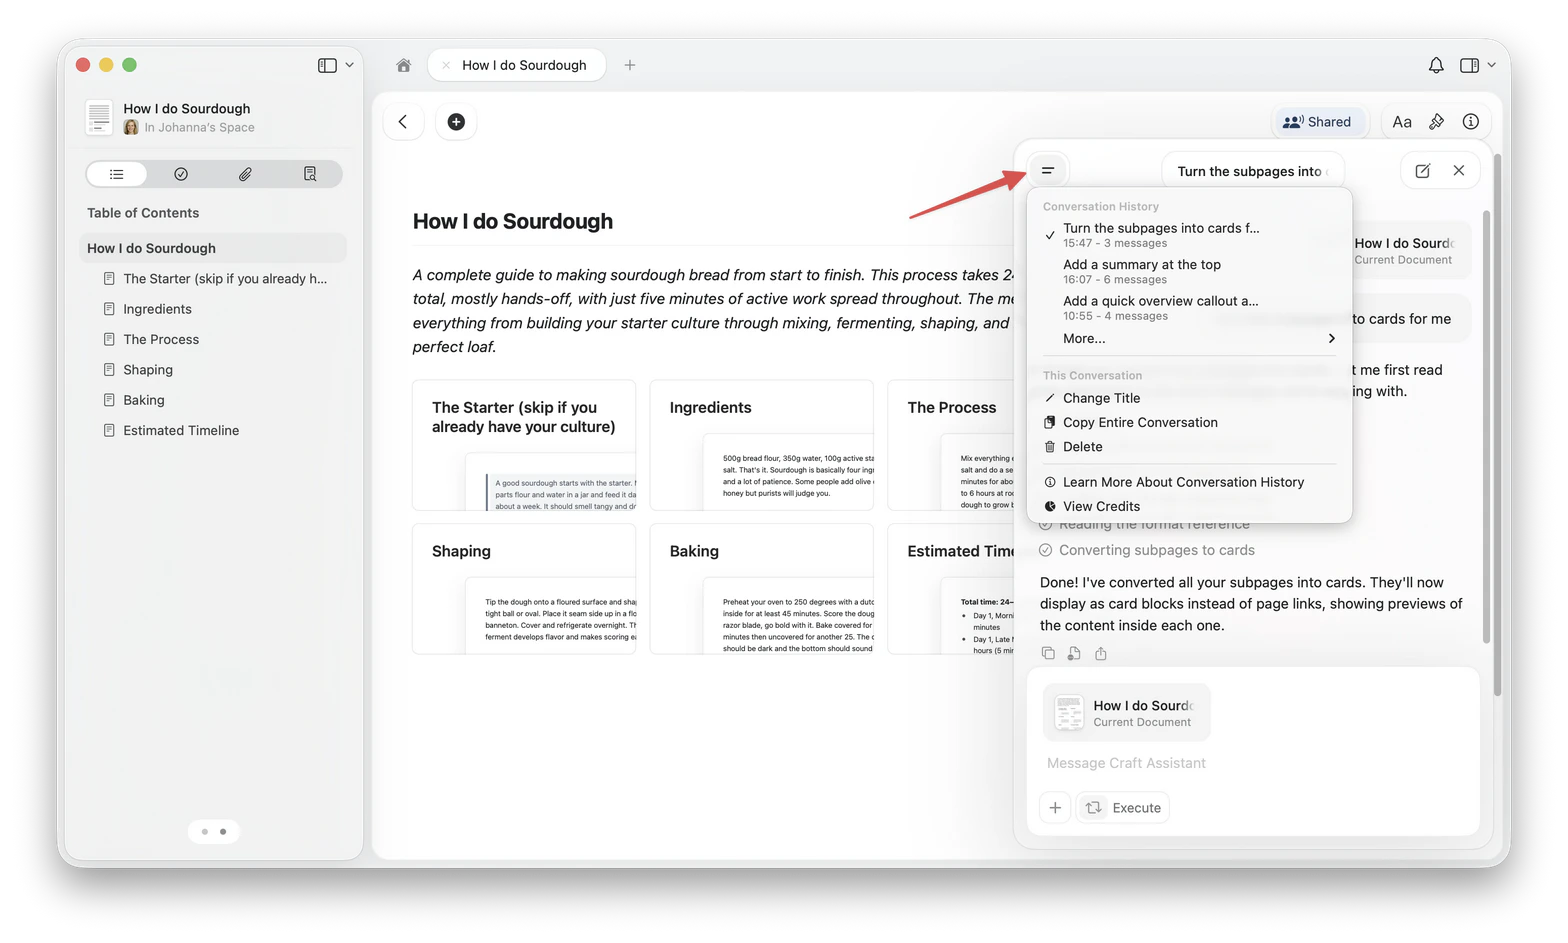
## 세션
Craft Assistant 세션은 연속성을 위해 설계되었습니다.
* 세션은 **기기 간에 동기화**됩니다.
* 세션은 **5분** 비활성 상태 후 일시 중지됩니다. 대화 기록은 보존됩니다.
* 목록에서 **이전 세션**을 다시 열 수 있습니다.
* **병렬 세션**을 실행할 수 있습니다.
* 백그라운드 세션이 완료되면 **알림 점**이 표시됩니다.
## 문서 편집하기
macOS와 iOS에서는 **Execute** 모드를 사용하여 변경 사항을 직접 적용하세요. 제안된 변경 사항을 먼저 검토하려면 **Explore** 모드를 사용하세요.
* **Explore** — 변경 사항을 제안하고 수정 전에 승인을 기다립니다.
* **Execute** — 변경 사항을 직접 적용합니다.
\*\*⌘Z (Ctrl+Z)\*\*로 마지막 Assistant 작업 전체를 실행 취소할 수 있습니다.
전체 편집 정보는 [Craft Assistant로 편집하기](/ko/ai-assistant/editing)를 참고하세요.
문서 수준 및 스페이스 수준에서 전체 편집 기능 지원.
iPad 및 iPhone의 문서 수준 및 스페이스 수준에서 전체 편집 기능 지원.
Assistant 사용 가능, Execute 모드는 추후 제공 예정.
Assistant 사용 가능, Execute 모드는 추후 제공 예정.
## 질문 예시
**콘텐츠 이해하기:**
* "작년에 이 주제에 대해 무엇을 작성했나요?"
* "프로젝트 Y에서 아직 열려 있는 작업은 무엇인가요?"
* "신규 직원 온보딩과 관련된 모든 메모를 요약해 주세요."
**특정 콘텐츠 작업하기:**
* "이 문서를 3개의 불릿 포인트로 요약해 주세요"
* "이 미팅 메모에서 모든 실행 항목을 추출하세요"
* "여기서 언급된 주요 결정 사항은 무엇인가요?"
**편집하기:**
* "이 문서 상단에 요약 콜아웃을 추가하세요"
* "색상으로 제목 스타일을 변경하고 구분선을 추가하세요"
* "섹션별로 하위 페이지로 나눠주세요"
* "이 페이지의 미팅 메모로 새 문서를 만들어 주세요"
**스페이스 수준 쿼리:**
* "마케팅 캠페인에 관한 모든 문서 찾기"
* "이번 주에 마감인 작업은 무엇인가요?"
* "Q4 프로젝트와 관련된 모든 것 보여주기"
Assistant는 속성과 관계를 포함한 컬렉션을 이해할 수 있습니다.
## 개인 정보 보호 및 데이터
Craft Assistant는 개인 정보 보호를 최우선으로 설계되었습니다.
* 세션은 연속성을 위해 기기 간에 동기화됩니다.
* Craft는 콘텐츠를 AI 모델 학습에 사용하지 않습니다.
* 요청 처리에 필요한 최소한의 데이터만 모델 제공업체에 전송됩니다.
* 토큰 사용량과 비용은 사용량 추적을 위해 기록됩니다.
AI 사용량에 대한 자세한 내용은 [사용량 및 제한](/ko/ai-assistant/usage)을 참고하세요.
## 모델 선택하기
선택한 모델에 따라 속도, 기능, AI 사용량이 달라집니다.
* **Core:** 일상적인 문서 내 쿼리. AI 사용량이 적습니다. 읽기 전용.
* **Fast:** 스페이스 수준 질문에 적합하며 편집을 지원합니다.
* **Max:** 복잡한 추론과 편집 품질에 최적입니다.
* **Local:** 기기에서 로컬로 실행되는 온디바이스 모델(Apple Foundation Model, LLaMa 3.2). 항상 무료. 읽기 전용.
**Fast**와 **Max**만 편집을 지원합니다.
자세한 내용은 [AI 모델 선택하기](/ko/ai-assistant/models)를 참고하세요.
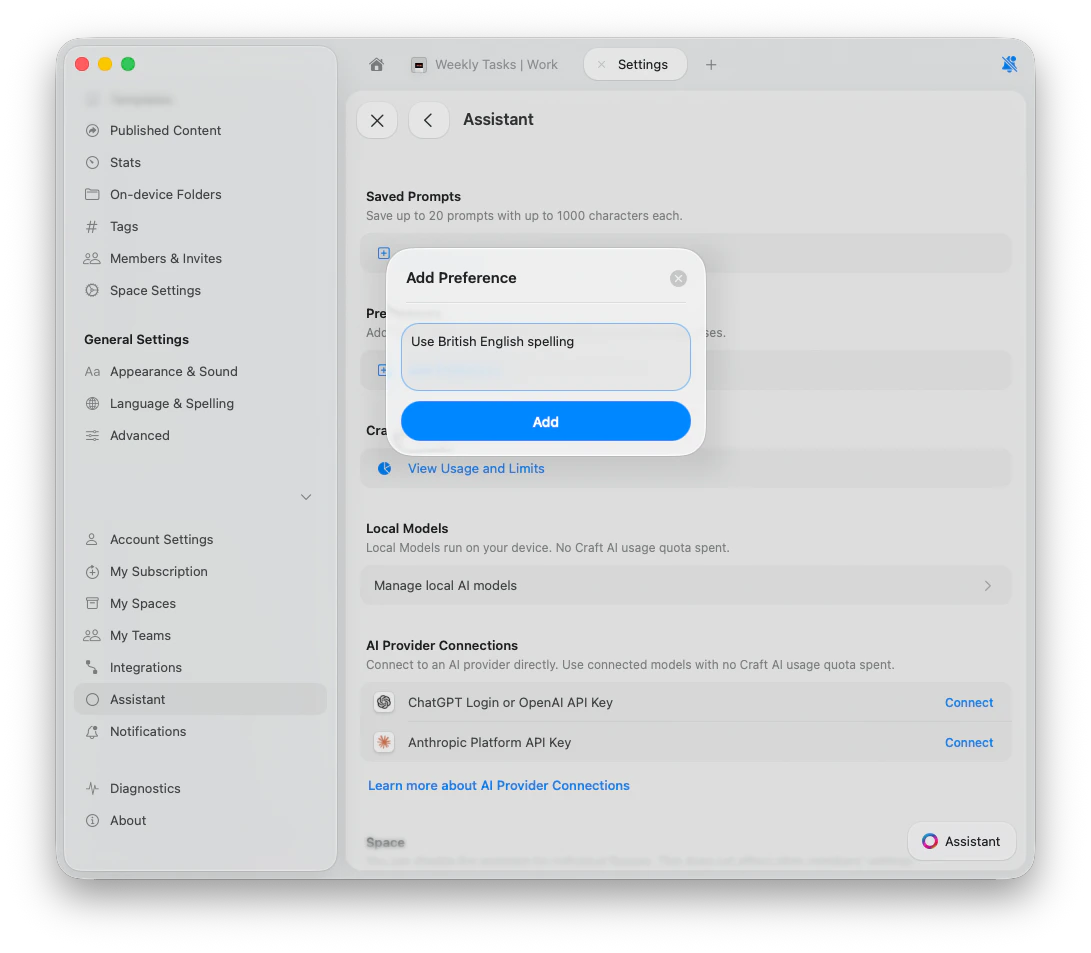
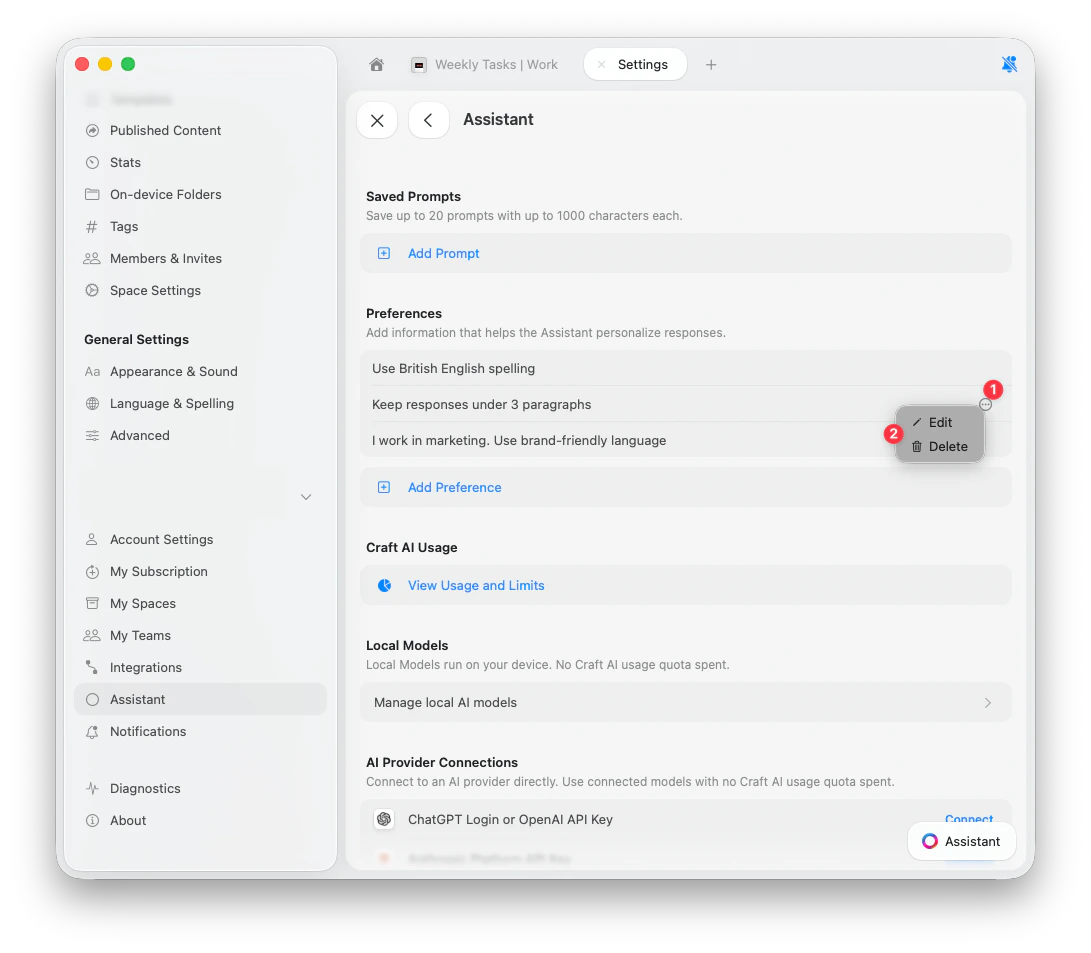
## Preferences
Preferences let you give the Assistant background information that applies to every conversation. Unlike custom prompts, which you select per task, preferences are always active regardless of which model or provider you use.
Use preferences for things like your preferred language, tone, response length, or role context.
### Add a preference
Go to **Settings** > **Assistant**.
Scroll to the **Preferences** section.
Tap **Add Preference**, type your instruction, and tap **Add**.
### Example preferences
* "Use British English spelling"
* "Keep responses under 3 paragraphs"
* "I work in marketing. Use brand-friendly language"
* "Always respond in Spanish"
* "When summarizing meetings, always extract action items with owners"
### Manage preferences
To edit or delete a preference, tap the **3-dots button** next to it and choose **Edit** or **Delete**.
## Assistant 비활성화
스페이스별로 Assistant를 끌 수 있습니다.
스페이스 설정을 여세요.
Assistant 토글을 끄세요.
이 설정은 기기나 사용자 간에 동기화되지 않습니다. 한 기기에서 비활성화해도 다른 기기에서는 변경될 때까지 활성화된 상태로 유지됩니다.
## 관련 문서
작업 및 편집 요구에 맞는 모델 선택
문서에서 직접 변경 사항 적용하기
일관된 결과를 위한 재사용 가능한 지침 만들기
OCR로 텍스트 추출 및 설명 생성하기
앱을 벗어나지 않고 Craft 기능에 대한 즉각적인 도움 받기
 ## Craft Assistant 사용 가능 위치
Craft Assistant는 모든 주요 플랫폼에서 작동합니다.
## Craft Assistant 사용 가능 위치
Craft Assistant는 모든 주요 플랫폼에서 작동합니다.
 ## 세션
Craft Assistant 세션은 연속성을 위해 설계되었습니다.
## 세션
Craft Assistant 세션은 연속성을 위해 설계되었습니다.
 * 세션은 **기기 간에 동기화**됩니다.
* 세션은 **5분** 비활성 상태 후 일시 중지됩니다. 대화 기록은 보존됩니다.
* 목록에서 **이전 세션**을 다시 열 수 있습니다.
* **병렬 세션**을 실행할 수 있습니다.
* 백그라운드 세션이 완료되면 **알림 점**이 표시됩니다.
## 문서 편집하기
macOS와 iOS에서는 **Execute** 모드를 사용하여 변경 사항을 직접 적용하세요. 제안된 변경 사항을 먼저 검토하려면 **Explore** 모드를 사용하세요.
* **Explore** — 변경 사항을 제안하고 수정 전에 승인을 기다립니다.
* **Execute** — 변경 사항을 직접 적용합니다.
\*\*⌘Z (Ctrl+Z)\*\*로 마지막 Assistant 작업 전체를 실행 취소할 수 있습니다.
전체 편집 정보는 [Craft Assistant로 편집하기](/ko/ai-assistant/editing)를 참고하세요.
* 세션은 **기기 간에 동기화**됩니다.
* 세션은 **5분** 비활성 상태 후 일시 중지됩니다. 대화 기록은 보존됩니다.
* 목록에서 **이전 세션**을 다시 열 수 있습니다.
* **병렬 세션**을 실행할 수 있습니다.
* 백그라운드 세션이 완료되면 **알림 점**이 표시됩니다.
## 문서 편집하기
macOS와 iOS에서는 **Execute** 모드를 사용하여 변경 사항을 직접 적용하세요. 제안된 변경 사항을 먼저 검토하려면 **Explore** 모드를 사용하세요.
* **Explore** — 변경 사항을 제안하고 수정 전에 승인을 기다립니다.
* **Execute** — 변경 사항을 직접 적용합니다.
\*\*⌘Z (Ctrl+Z)\*\*로 마지막 Assistant 작업 전체를 실행 취소할 수 있습니다.
전체 편집 정보는 [Craft Assistant로 편집하기](/ko/ai-assistant/editing)를 참고하세요.

 ### Example preferences
* "Use British English spelling"
* "Keep responses under 3 paragraphs"
* "I work in marketing. Use brand-friendly language"
* "Always respond in Spanish"
* "When summarizing meetings, always extract action items with owners"
### Manage preferences
To edit or delete a preference, tap the **3-dots button** next to it and choose **Edit** or **Delete**.
### Example preferences
* "Use British English spelling"
* "Keep responses under 3 paragraphs"
* "I work in marketing. Use brand-friendly language"
* "Always respond in Spanish"
* "When summarizing meetings, always extract action items with owners"
### Manage preferences
To edit or delete a preference, tap the **3-dots button** next to it and choose **Edit** or **Delete**.
 ## Assistant 비활성화
스페이스별로 Assistant를 끌 수 있습니다.
## Assistant 비활성화
스페이스별로 Assistant를 끌 수 있습니다.