

Creating a New Table
- macOS
- iOS
- Web
- Slash Command
Using the Insert Panel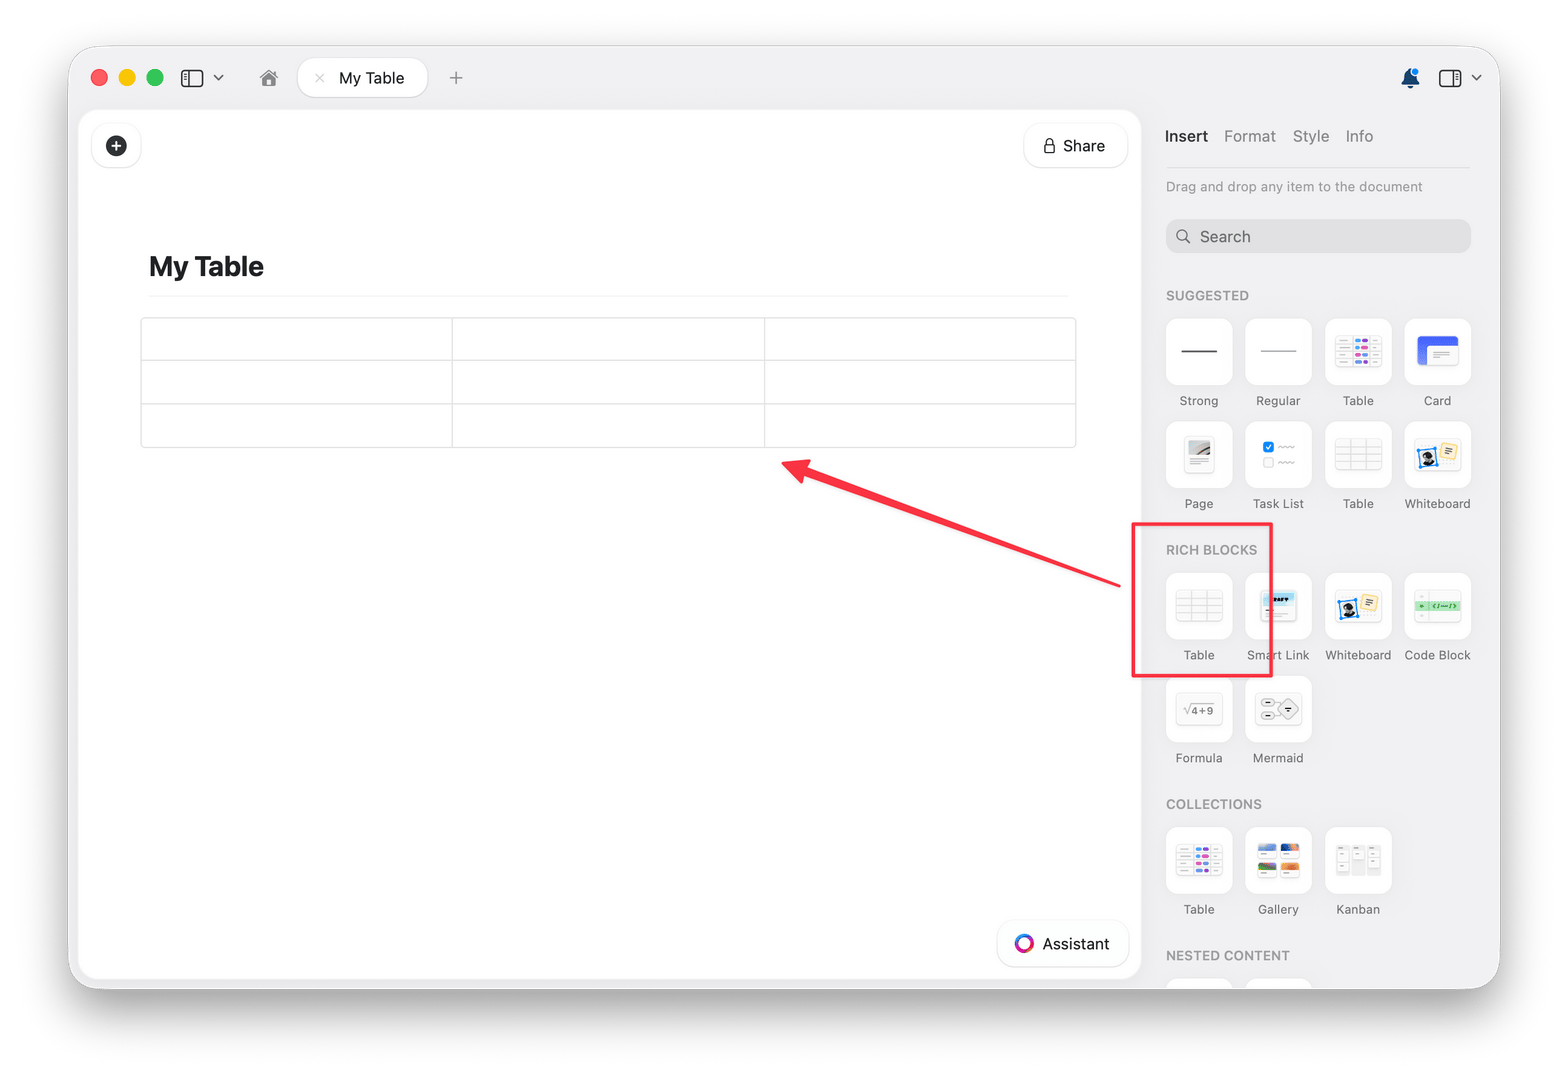
1
Open the Insert panel from the right sidebar
2
Drag the Table block into your document
3
Choose your initial table size (rows and columns)
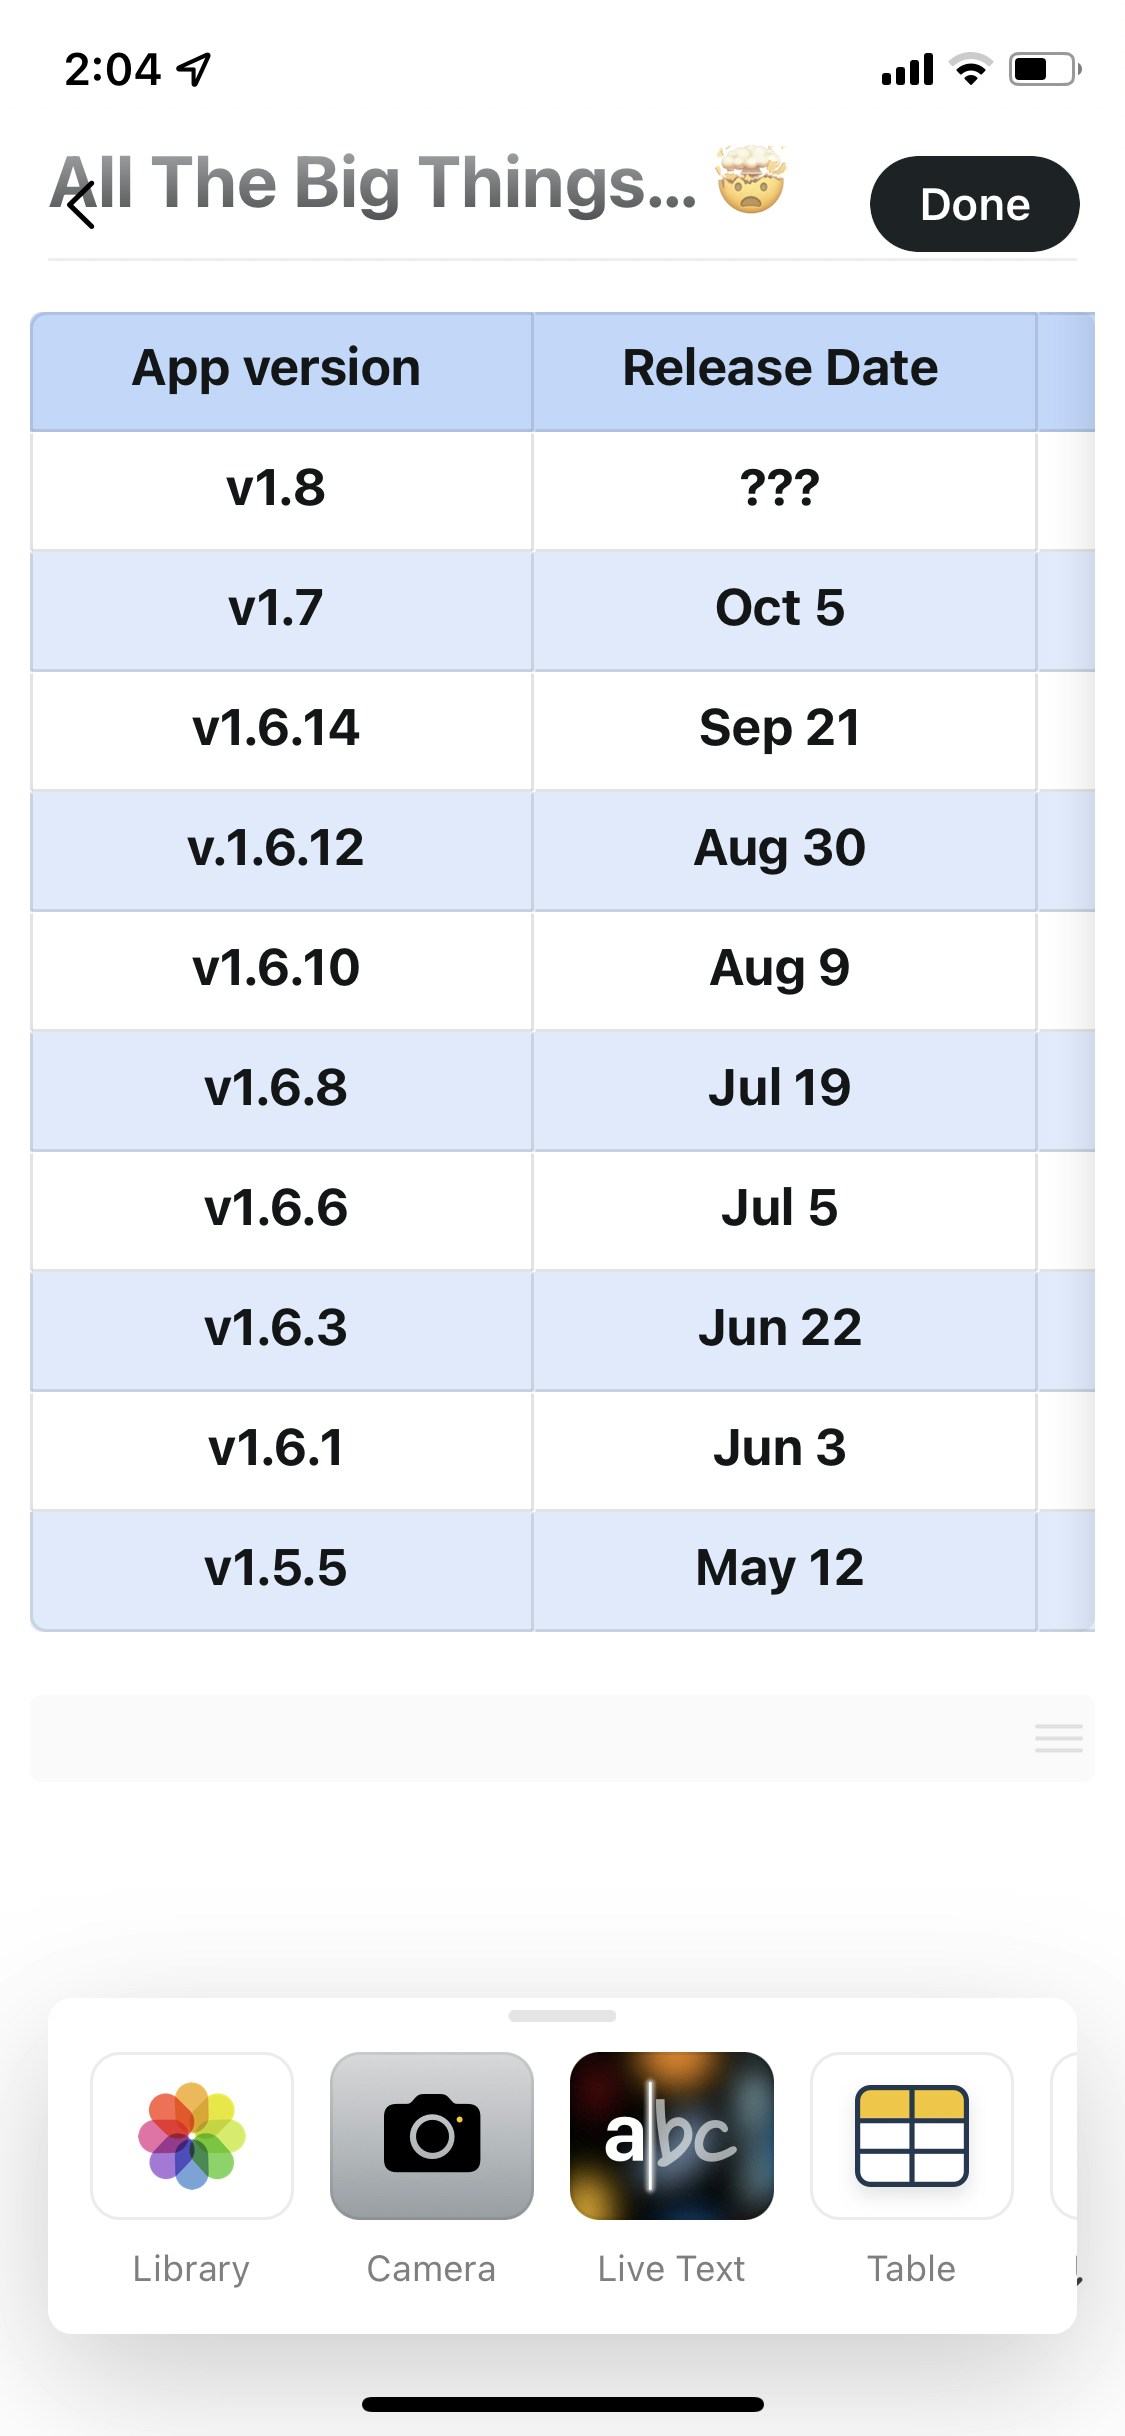
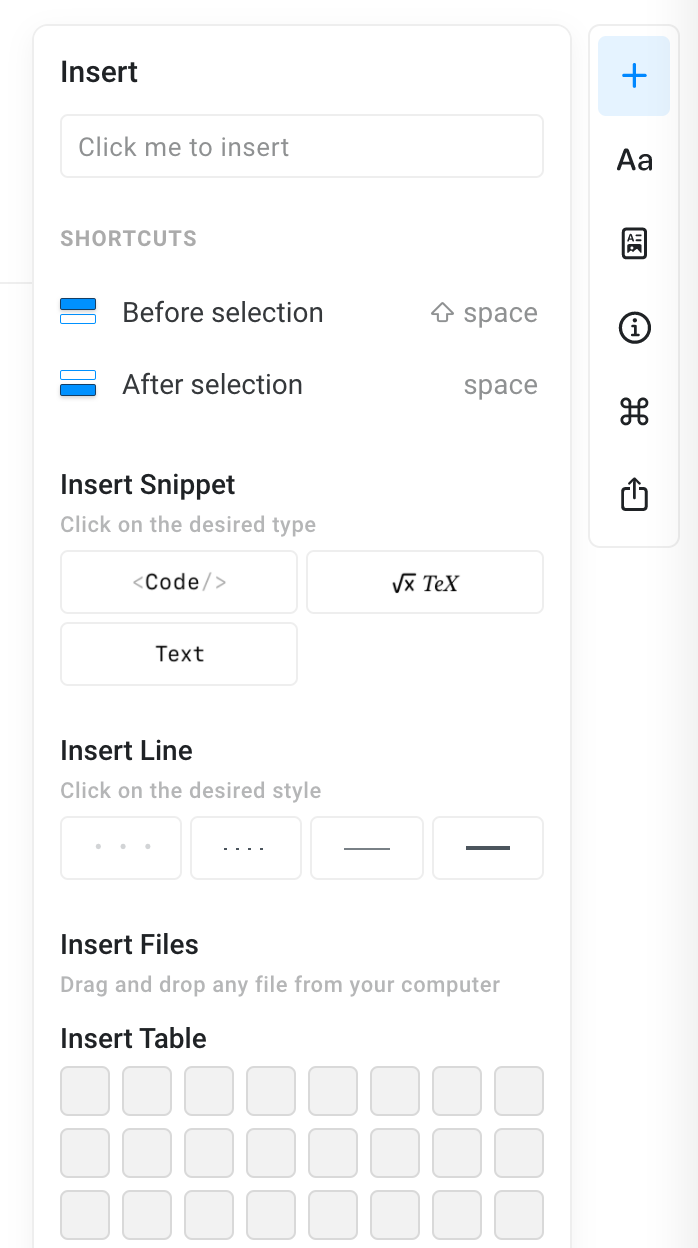
Working with Table Structure
Once your table is created, you can modify its structure. Adding Rows and Columns- Right-click any cell (Mac) or tap the three-dot menu (mobile)
- Choose to insert rows above/below or columns left/right
- Add as many as you need
- Right-click the row or column you want to remove
- Select “Delete Row” or “Delete Column”
1
Click outside any cell, then click the block handle (the dot to the left of the table) to select the whole table as a block
2
Press Delete or Backspace, or open the block menu and choose Delete
The block handle only engages when your cursor isn’t inside a cell. If clicking the handle doesn’t select the table, click somewhere outside the table first, then try again.
- Hover over column borders (Mac/Web)
- Drag to adjust width
- Each column can have its own width
- Turn the first row into a header row by enabling Header row in the table’s style options
- You can also enable Header column to use the first column as a header
- Header rows stay in place when you sort the table
Cell Formatting
Apply formats to cells to control how values display.- All Platforms
Available Formats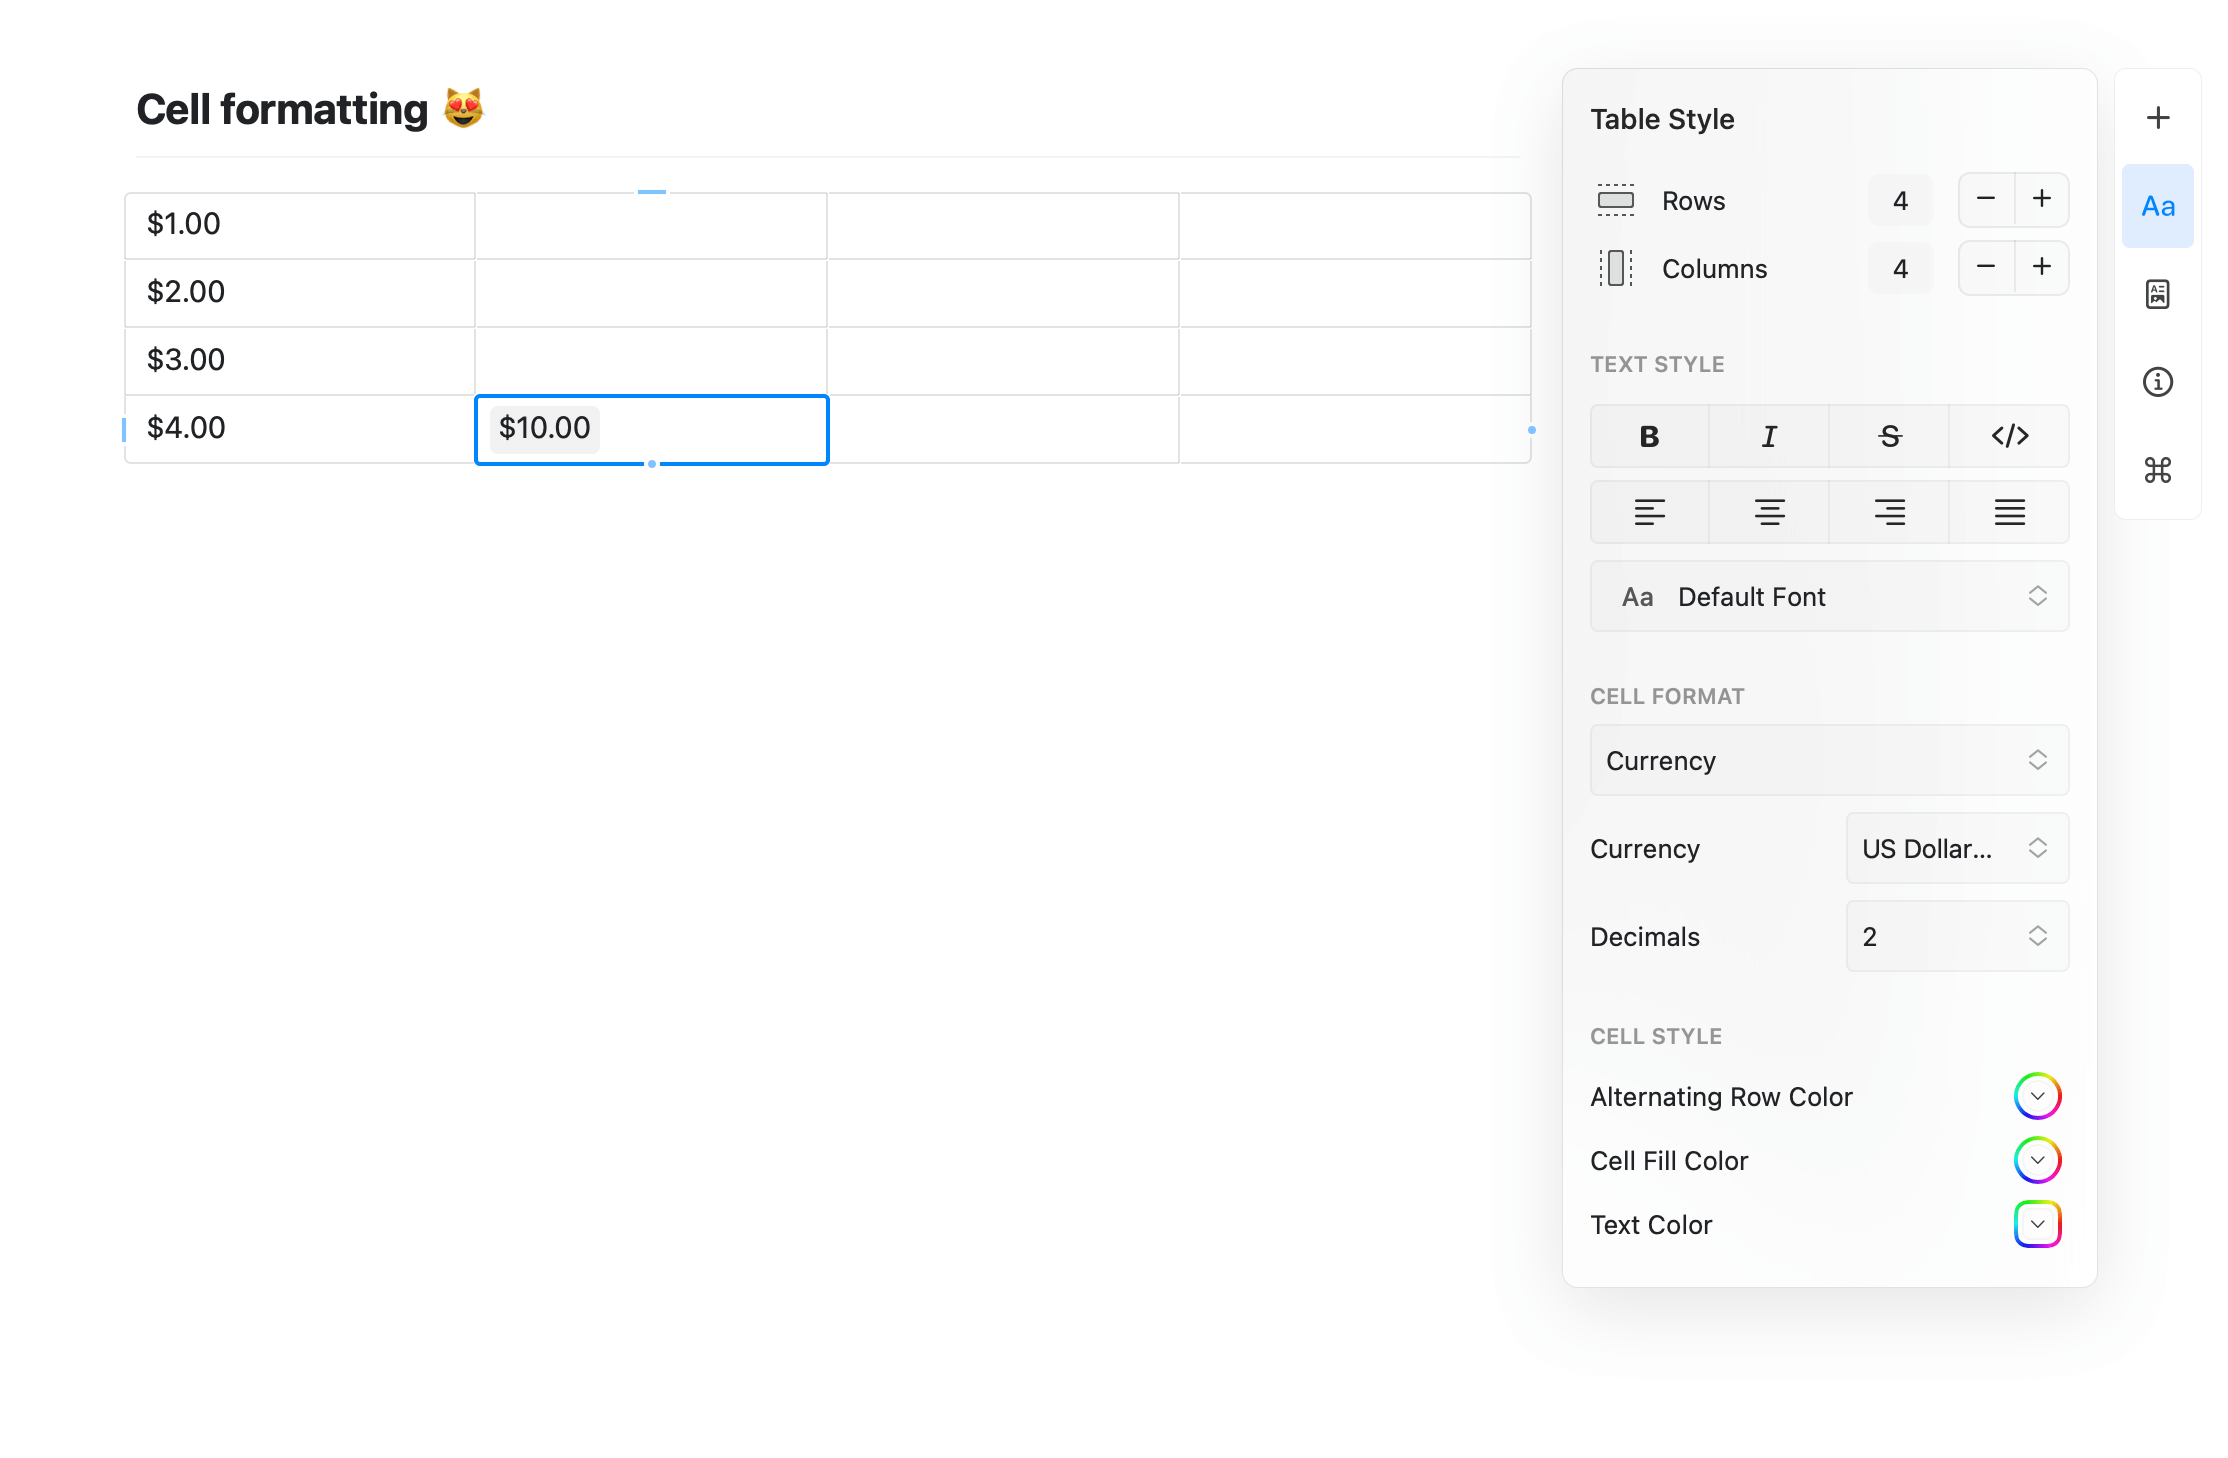
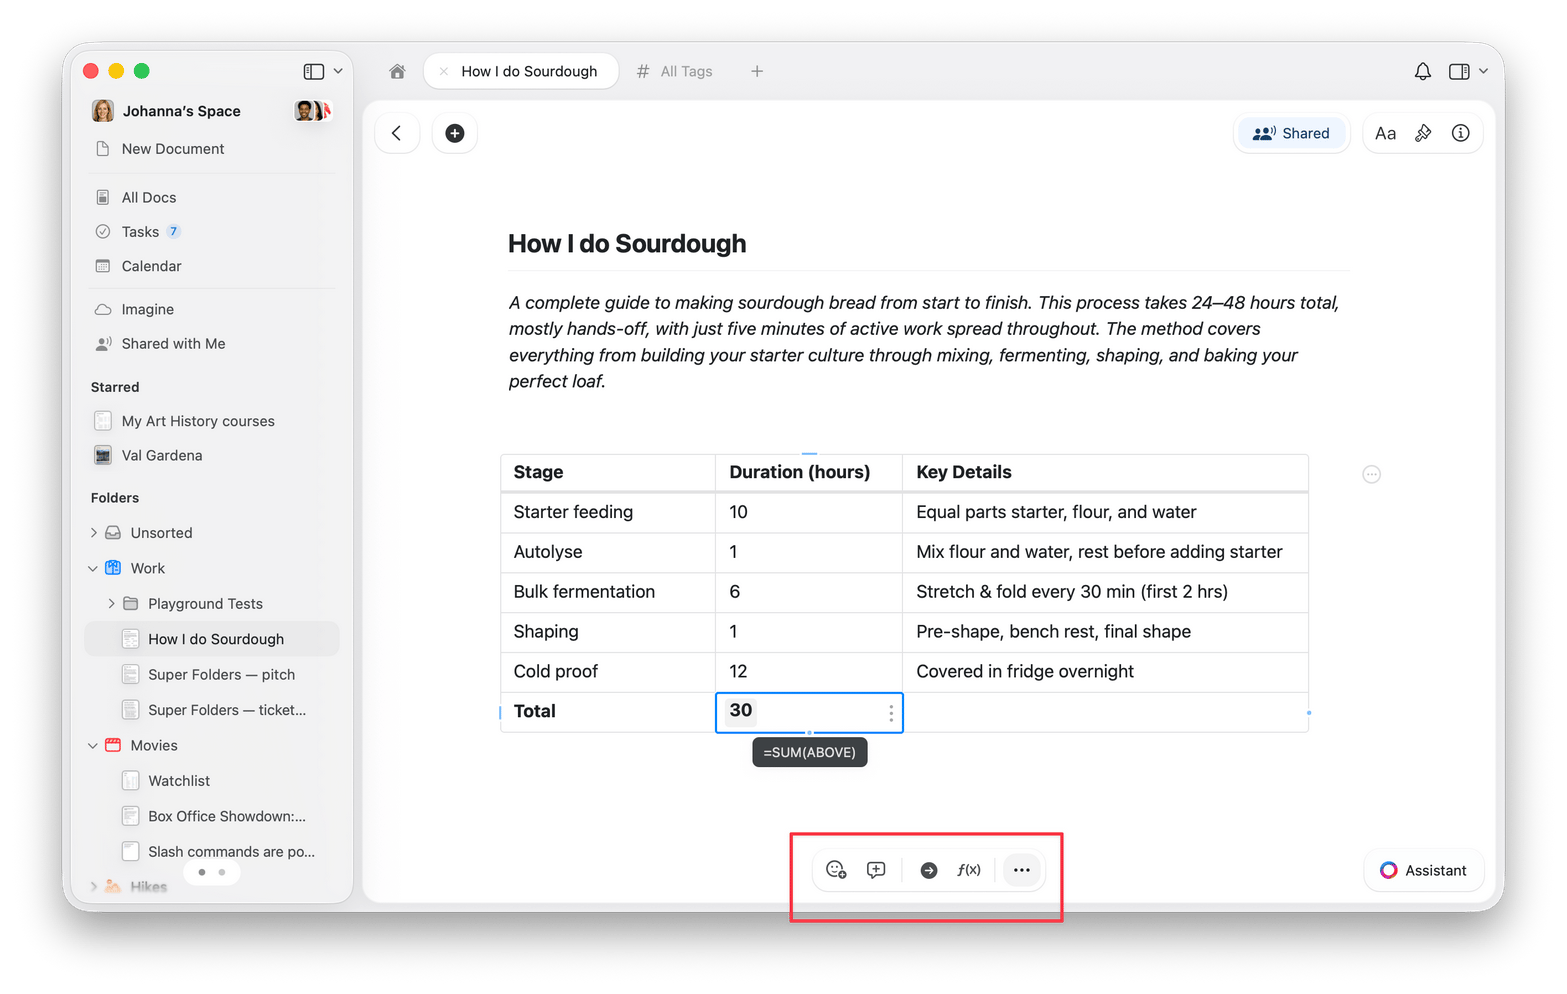
- Plain Text: Default format for text content
- Number: Formats numbers with proper alignment
- Percent: Displays values as percentages (0.5 becomes 50%)
- Currency: Adds currency symbols and formatting
1
Select one or more cells (click and drag to select multiple)
2
Right-click (Mac) or tap the three-dot menu
3
Choose your desired format from the menu
When you apply a format to a column header, new cells added to that column automatically inherit the same format.
Using Formulas
Use formulas to calculate values in your tables, for budgets, metrics, or other data analysis.Starting a Formula
1
Click into a cell where you want the formula result
2
Type
= to begin formula mode3
Start typing your formula or select from suggestions
4
Press Enter to confirm
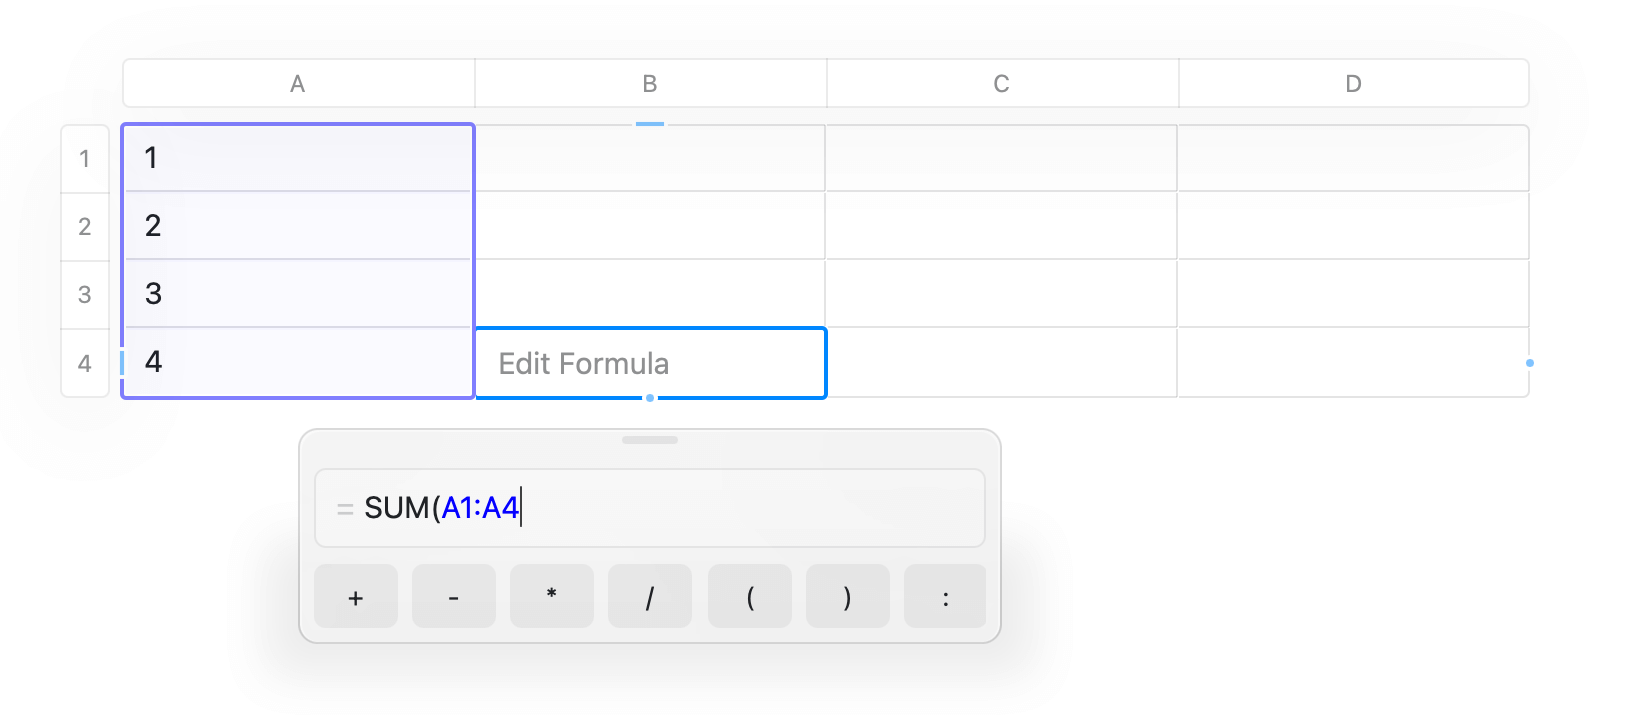
Available Functions
Craft supports many standard spreadsheet formulas: Statistical FunctionsSUM(range)- Add up numbersAVERAGE(range)- Calculate averageCOUNT(range)- Count numeric cellsCOUNTA(range)- Count non-empty cells (including text)MIN(range)- Find minimum valueMAX(range)- Find maximum valueMEDIAN(range)- Find the middle valueMODE(range)- Find the most frequently occurring value
ROUND(number, decimals)- Round to specified decimalsABS(number)- Absolute valueINT(number)- Integer part of a number (truncates toward zero)PRODUCT(range)- Multiply all values togetherSIGN(number)- Return -1, 0, or 1 based on sign of the number
Referencing Cells
Use standard spreadsheet notation:A1- Single cell referenceA1:A5- Range of cells (rows 1-5 in column A)B2:D2- Range across columns
=SUM(A1:A10)- Sum all values in column A, rows 1-10=AVERAGE(B2:B20)- Average of column B, rows 2-20=ROUND(SUM(A1:A5)/5, 2)- Average rounded to 2 decimals
Formulas recalculate automatically when referenced cells change.
Sorting Data
Organize your table data by sorting any column in ascending or descending order. To Sort a Table1
Right-click any cell in the column you want to sort by
2
Choose “Sort Ascending” or “Sort Descending” from the menu
3
The entire table reorders based on that column
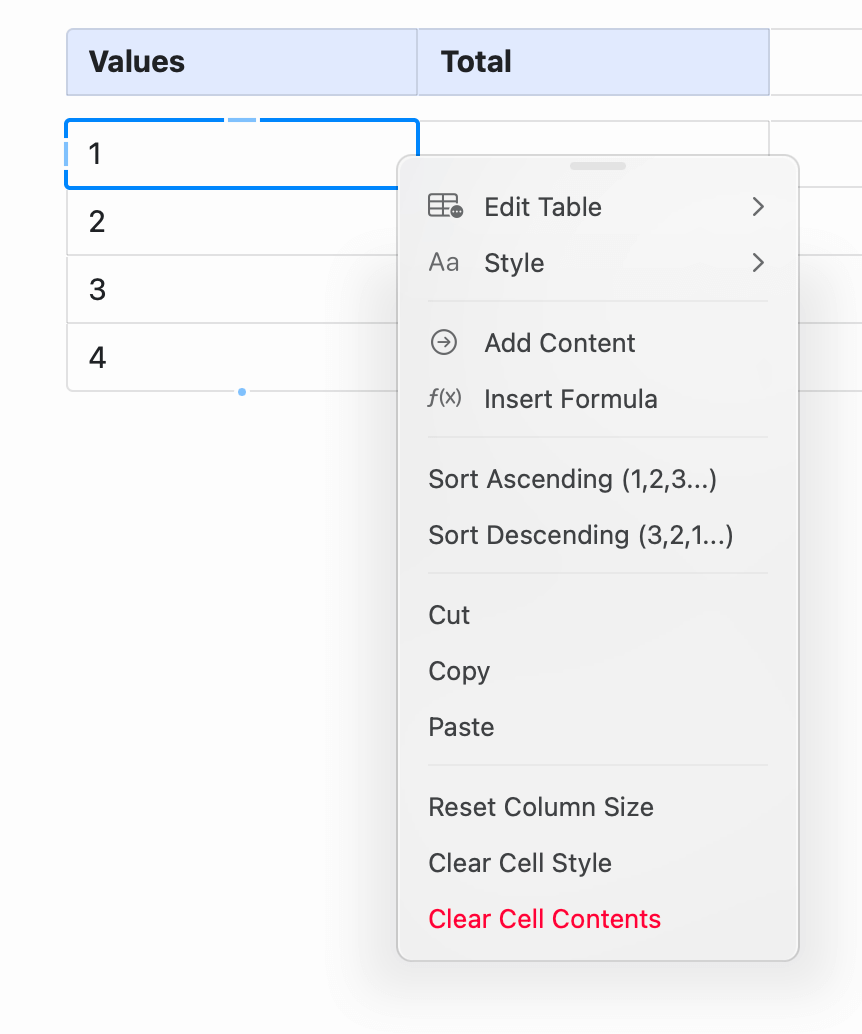
If your table has a header row, it stays in place when you sort. Only the rows below it are reordered. See Header Rows and Columns above for how to enable it.
- Numbers sort numerically (1, 2, 10, not 1, 10, 2)
- Text sorts alphabetically
- Empty cells move to the bottom
- Formulas maintain their references even after sorting
Keyboard Navigation in Tables
Work efficiently within tables using these shortcuts: macOSTab- Move to next cell (creates new column at end)Shift+Tab- Move to previous cellEnter- Move down one row (creates new row at bottom)Cmd+Arrow Keys- Jump to edge of table
Tab- Move to next cellShift+Tab- Move to previous cellEnter- Move down one rowCtrl+Arrow Keys- Jump to edge of table
Pressing Tab at the last cell of a row automatically adds a new column. Pressing Enter at the bottom row adds a new row.
Convert a Table into a Collection
If your table outgrows simple rows and columns, you can turn it into a collection:1
Right-click the table (Mac) or tap the three-dot menu
2
Choose Turn into Collection
Tables vs Collections
Consider using Collections instead of a table when you need:- Database-like views (gallery, board, list)
- Multiple views of the same data
- Rich content within cells (nested pages, images)
- Filtering and grouping
- Relations between items
- You need simple rows and columns
- Formulas and calculations are important
- You want a traditional spreadsheet feel
- Data is primarily text and numbers
- Each row represents a rich item (project, person, task)
- You want multiple ways to view the same data
- You need to filter, group, or relate items
- Visual organization (cards, boards) is helpful
Common Use Cases
Budget PlannerTips for Working with Tables
Start Simple: Begin with a basic table and add complexity (formulas, formatting) as needed. It’s easier to expand than to simplify. Use Formatting: Apply number, currency, or percent formats to make data clearer at a glance. Keep Formulas Visible: In complex tables, consider adding a note column explaining what formulas do. Export When Needed: Tables copy and paste well into spreadsheet applications if you need more advanced features. Combine with Text: Add explanations above or below your tables for context.Collections
Database-like features for rich data
Formatting
Text and content formatting options
Blocks and Pages
Understanding Craft’s content structure